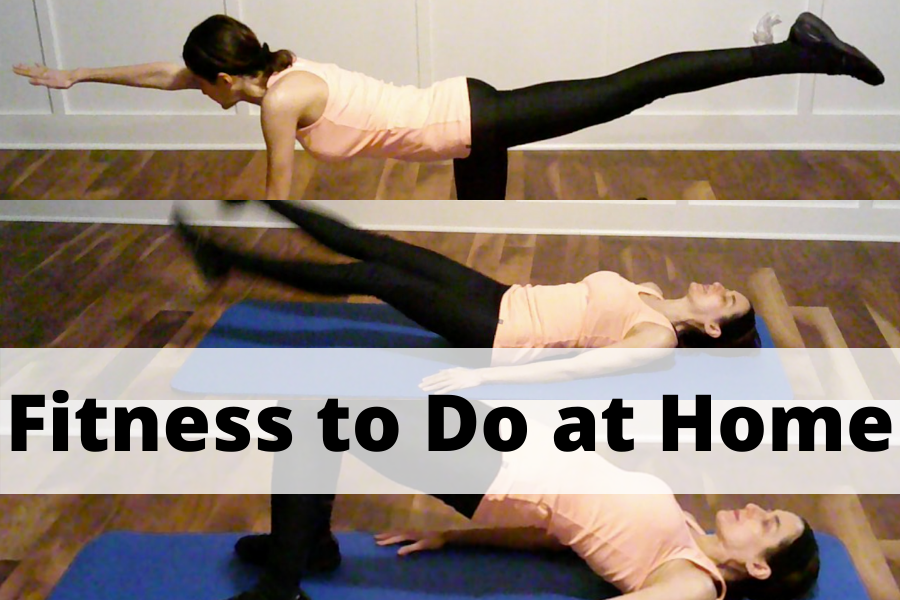
Want to know the best exercises for fitness to do at home? These 33 exercises are the best because they are a collection of popular exercises without equipment that are taught by personal trainers, pilates, and yoga instructors.
Sometimes it’s hard to think of what fitness to do at home. These 33 popular home-friendly exercises without equipment will give you lots of ideas, clarify the moves for you, and let you know the muscles worked.
These exercises are commonly promoted by modern day personal trainers, yoga instructors, and pilates instructors. I personally did all these exercises at L.A. Fitness when I took classes and had a personal trainer there. I got great results and want to share this knowledge with the world and have it written down and filmed for quick reference.
Most of these fitness exercises can be done by the average beginner. Some of these exercises are more challenging (these appear in the “Intermediate Level Exercises” section below). Only do the exercises you think you can handle and consult a medical professional if you are unsure about what exercises you can do.
Benefits you can expect from these exercises include full body toning, increased strength, and better balance. I did just a few reps of all these exercises to create the gif images, and I was still feeling these exercises 3 days later. Lol : ) Pace yourself. I don’t recommend doing all these exercises in one day. Just by adding one, two, or three of these exercises to your home workout routine, you will notice a difference. They work great and will get you fast results.
Choose your own adventure by mixing and matching these exercises. Varying your workout will help you tone faster. These 33 exercises will make sure you never run out of ideas for fitness to do at home.
This post is all about fitness to do at home.
33 Amazing Exercises for Fitness to Do at Home
Home Fitness Do’s…
- Begin your workout with the warm up exercises to feel more comfortable during your workout.
- Keep a clean pair of sneakers that you use only for home workouts. Sneakers are especially helpful to reduce impact on your feet and ankles during jumps.
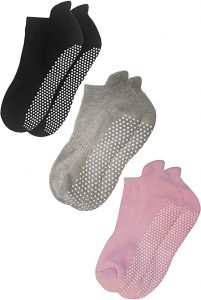
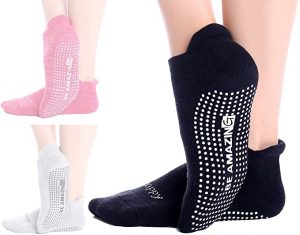
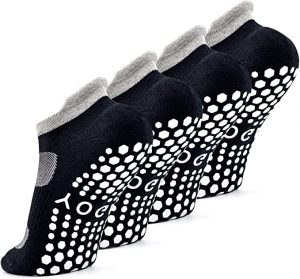
- For exercises where you don’t need sneakers, consider wearing socks with grippers for more flexibility with your feet and stability during your workout.
- Rest at least 10 seconds, but not more than a minute between each set, unless you really need to rest more. Rests help your muscles recover just enough so you can give 110% to each set. Rests that are too long can make your workout less effective.
- A non-skid surface such as a yoga mat is essential for some of these exercises, especially when your knees are directly on the floor. You can substitute a yoga mat with a blanket but this may be a little slippery, but for the exercises where you are on your knees, a little bit of slipperiness should not be too bad and may engage more of your muscles.
- Perform all jumps on a non-skid floor such as carpet or hardwood floors. A yoga mat may actually trip you up and is not recommended while you’re doing the side lunge exercise, walking lunge, or any exercise that involves a jump.
- It’s good to stay hydrated during your workout. Take small sips of water as needed during your workout or before or after your workout. Hydration helps prevent muscle fatigue, muscle cramps, dehydration, and exhaustion.
Home Fitness Don’ts
- Moves with twists and back bends are not recommended by most yoga practitioners if you are menstruating.
- Do not exercise after eating. Ideally, allow several hours after a full meal or 2 hours after a snack before exercising.
- If you feel any discomfort or pain anywhere in your body, try performing the exercise less intensely. If the discomfort continues, stop performing the exercise and consult a medical doctor before resuming the exercise. Never perform any exercise if it causes you pain.
- Don’t strain or overexert yourself.
- If you have health concerns or are pregnant, don’t perform any exercise program before getting the approval of your doctor.
Our Favorite Yoga Mats
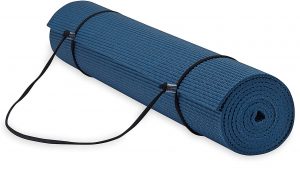
1. Amazon Basics 1/2-Inch Extra Thick Exercise Yoga Mat.
Offered in 5 colors.
Dimensions: 74″ x 24″ x 0.5″
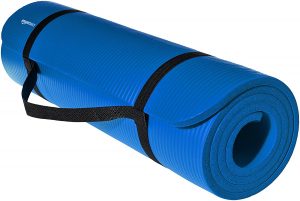
Click here to check it out at Amazon.
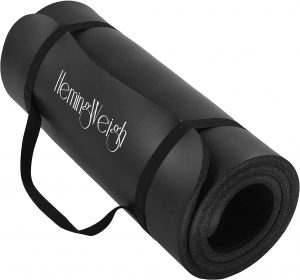
2. HemingWeigh 1 inch Thick Yoga Mat, Extra Thick, Non Slip Exercise Mat for Indoor and Outdoor Use, Black
Offered in black color only.
Dimensions: 70″ x 23″ x 1″
Click here to check it out at Amazon.
3. Gaiam Essentials Premium Yoga Mat with Yoga Mat Carrier Sling
Offered in 7 colors.
Dimensions: 72″ x 24″ x 1/4″
Click here to check it out at Amazon.
4. YogaAccessories Extra Wide and Extra Long Deluxe Yoga Mat
Offered in 3 colors.
Dimensions: 84″ x 36″ x 1/4″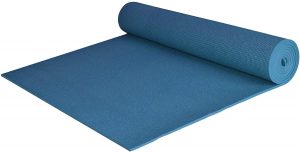
Click here to check it out at Amazon.
Our Favorite Socks with Grippers
1. RATIVE Anti Slip Non Skid Barre Yoga Pilates Hospital Socks with grips for Adults Men Women
Click here to check them out on Amazon.
2. Non-Slip Socks Yoga Barre Pilates Hospital Maternity Sock w/Grips For Women Men
Click here to check them out on Amazon.
3. Busy Socks 2 Pack Non Slip Yoga Pilates Fitness Grip Socks for Women Men, Non Skid Barre Dance Ankle Cushioned Sock
Click here to check them out on Amazon.
Fitness to Do at Home | Warm Up Exercises:
Neck Warm Up
Neck Stretching Warm Up Exercise Tips:
- Sit on the floor with one foot in front of the other.
- Stretch out both arms to your sides on the floor as far as you can.
- Face forward with a straight back and tall posture, then gently lean your neck to one side and hold this position for a count of 5.
- You can rest the hand that’s on the same side you’re leaning towards on your leg. Keep your opposite arm stretched out to feel the stretch on the side of your neck.
- Next turn your face towards your shoulder and hold for a count of 5. This helps you feel the stretch on the back of your neck.
- Gently turn your face forward again and bring your head back up to center.
- Repeat this move for the other side of your neck.
- Stretch gently. Don’t push it.
Arm Warm Up
Arm Warm Up Exercise Tips:
- Start by rotating both wrists in both directions.
- Rotate your elbows in both directions.
- Rotate your entire arms in both directions like you’re swimming
- Shake out both arms at the end gently.
Leg Warm Up
Leg Warm Up Tips:
- Begin by rotating one ankle in both directions, keeping your toes on the floor and spinning your ankle clockwise and counterclockwise.
- Balance on one leg and raise your other leg a few inches off the ground to rotate your ankle clockwise and counterclockwise in the air.
- Next, rotate at your knee joint clockwise and counterclockwise, holding your leg up in the air.
- Next, rotate your leg at your hip joint clockwise and counterclockwise.
- Finally, shake out your leg gently. Repeat these moves with your other leg.
- If you need help balancing during this warm up, you can hold onto a wall or the back of a chair while doing this exercise.
Torso Twist
Torso Twist Tips:
- Keep your knees slightly bent.
- Let your body be relaxed and loose.
- Flop with your upper body from side to side, swinging your arms from side to side. Really get movement going here.
Fitness to Do at Home | Beginner Level Exercises:
1. Cat Cow Stretch
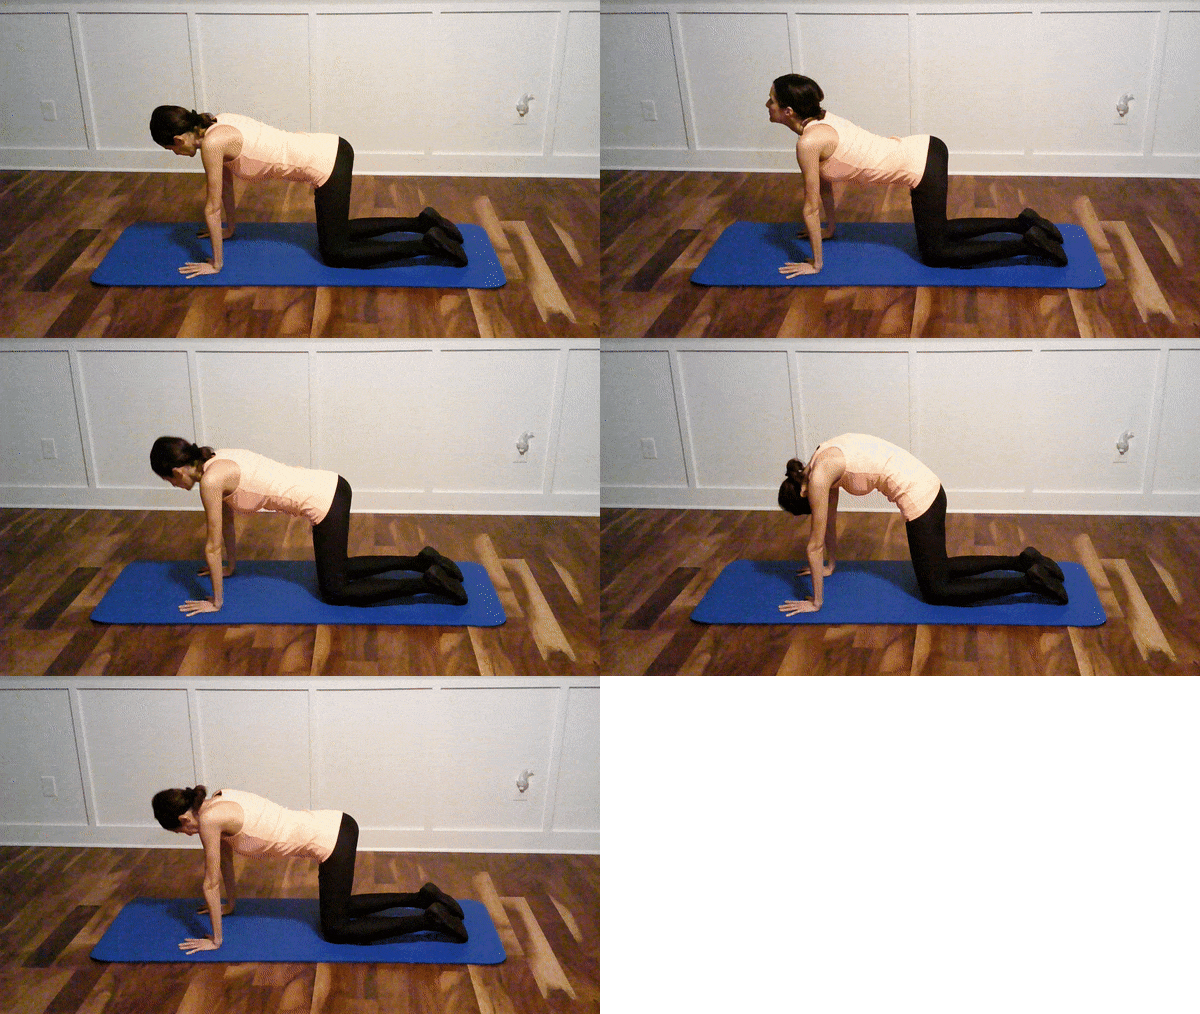 Click this link to watch the full Cat Cow Stretch video on YouTube.com
Suggested amount:
Beginner: 2 sets of 3 reps of each pose
Intermediate: 3 sets of 5 reps of each pose
Tips:
- Inhale as you enter cow pose, the pose where you look up.
- Exhale as you enter cat pose, the pose where you look down.
Muscles worked:
Back and neck.
Video:
Check out how to do a cat cow pose for energy | yoga by Howcast on YouTube.
Benefits:
- Increases flexibility of your back and neck muscles.
2. Superman Exercise
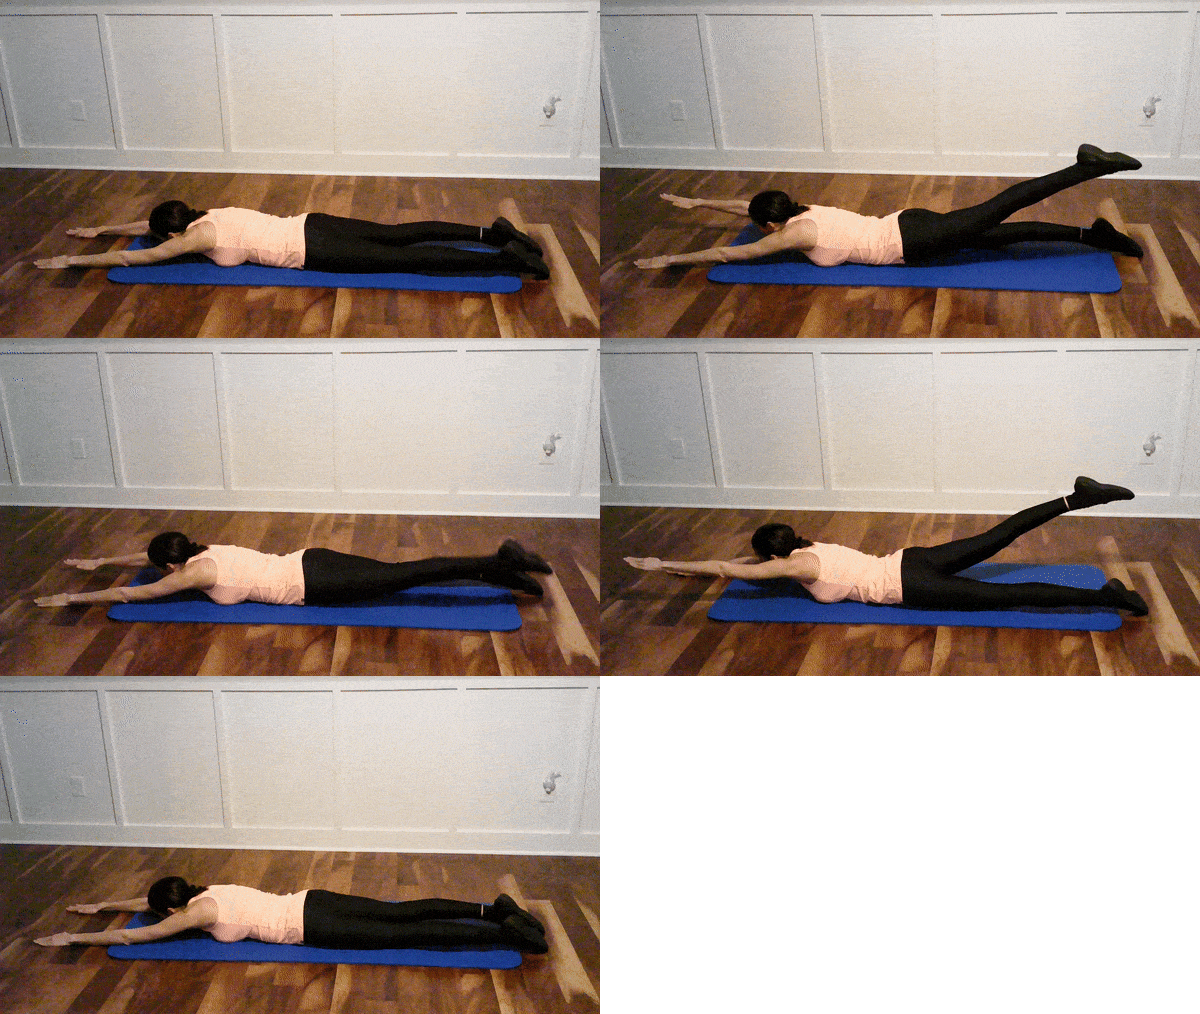 Click this link to watch the full Superman Exercise video on YouTube.com
Suggested amount:
Beginner: hold the stretch for 3 seconds on each side for 3 sets
Intermediate: hold the stretch for 5 seconds on each side for 3 sets
Tips:
- Raise one arm and the opposite leg at the same time.
- Use a yoga mat to cushion your pose.
- Lie on the floor flat on your belly with your arms stretched out before you and your legs stretched out behind you.
Muscles worked:
Glutes, back, and hamstrings.
Video:
Check out how to do superman exercises by Livestrong.com on YouTube.
Benefits:
- Strengthens your upper and lower back.
- Good counterpart for the many exercises that strengthen your abs.
3. Forearm Plank
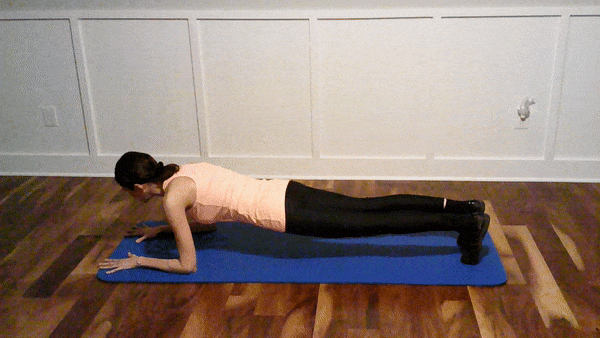 Click this link to watch the full Forearm Plank video on YouTube.com
Suggested amount:
Beginner: 3 sets of 10 seconds
Intermediate: 3 sets of 30 seconds
Tips:
- You can start on all fours on the ground and gradually push each leg and forearm into position.
- Maintain a straight line from your head, neck, back, butt, legs and heels.
- Keep your forearms on the floor with your hands flat on the floor or clasped together, whichever feels more comfortable.
- Keep your elbows directly below your shoulders.
Muscles worked:
Abs, core, and obliques. The forearm plank focuses more on the core muscles than the hand plank does.
Video:
Check out how to do a forearm plank by Physique 57 on YouTube
Benefits:
- Plank strengthens your spine, back, and abdominal muscles.
- Helps improve your posture and flexibility.
- Helps reduce back pain and flatten your belly.
4. Donkey Kicks
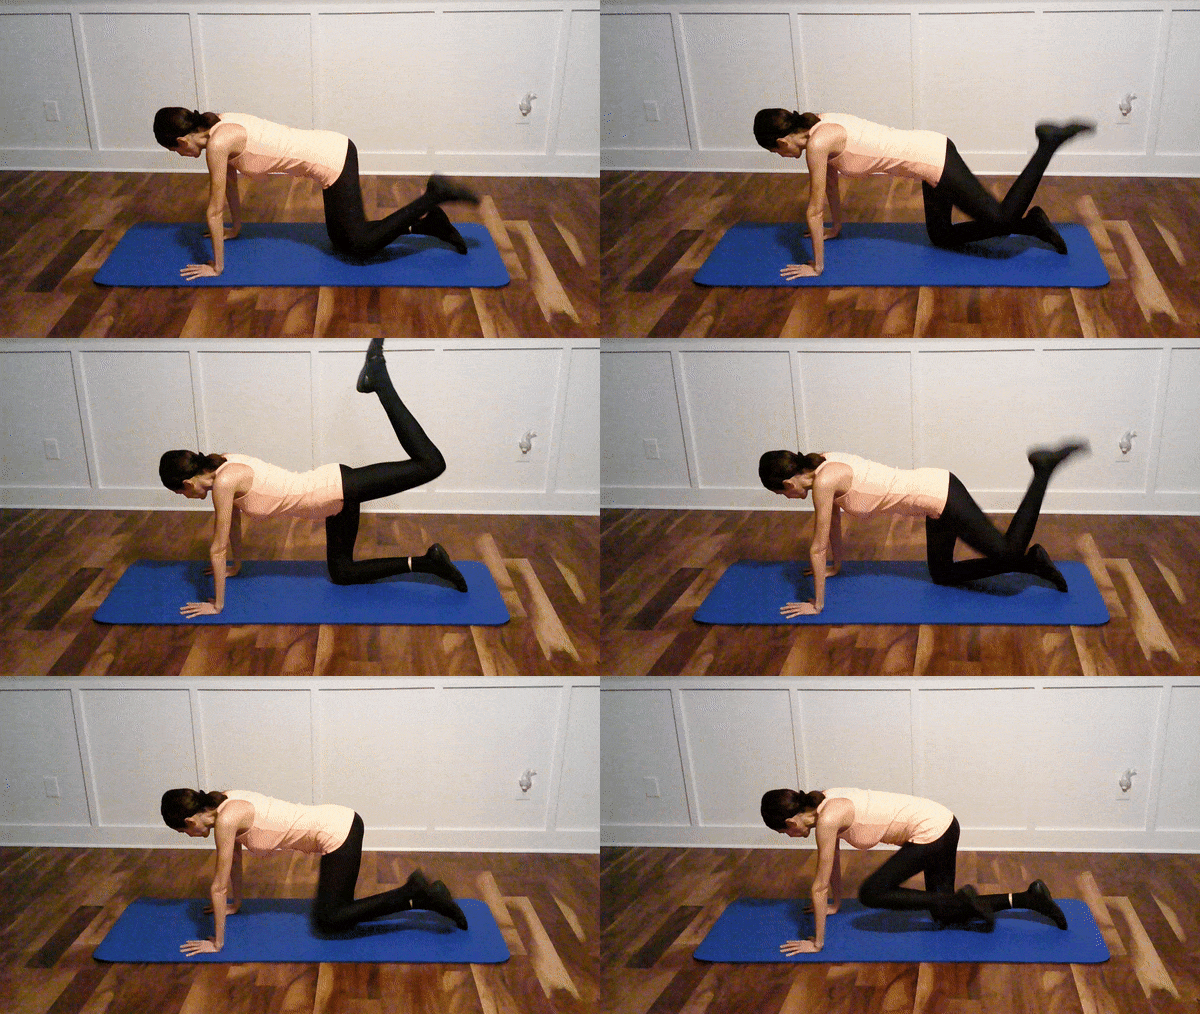 Click this link to watch the full Donkey Kicks video on YouTube.com
Suggested amount:
Beginner: 3 sets of 10 reps (5 reps on each side)
Intermediate: 3 sets of 20 reps (10 reps on each side)
Tips:
- Start down on the ground on all fours. Hands are directly below your shoulders. Your knees are at a 90 degree angle and are directly below your hips.
- Raise one leg, maintaining it at a 90 degree angle. Raise it until the upper part of your back leg is level with your back. Draw the bent leg back in towards your chest. Keep your back leg elevated the whole time until you complete all the reps for that leg.
- Perform the exercise on a yoga mat to reduce stress on your hands and knees.
- Keep your palms flat on the floor with your fingers spread wide apart to distribute your weight more evenly across your hands and reduce stress on your wrists.
- Keep your entire body stable and only move the one leg in a backward bended leg curl motion.
- Don’t let your lower back arch as your leg lifts. Arching your back engages your back more than your glutes.
Muscles worked:
Glutes, core, and shoulders.
Video:
Check out donkey kicks by LiveStrongWoman on YouTube.
Benefits:
- Stability and toning.
- Great for people who sit at a desk all day. Lets your hips move in the opposite direction we hold them in when we sit.
5. Fire Hydrant Exercise
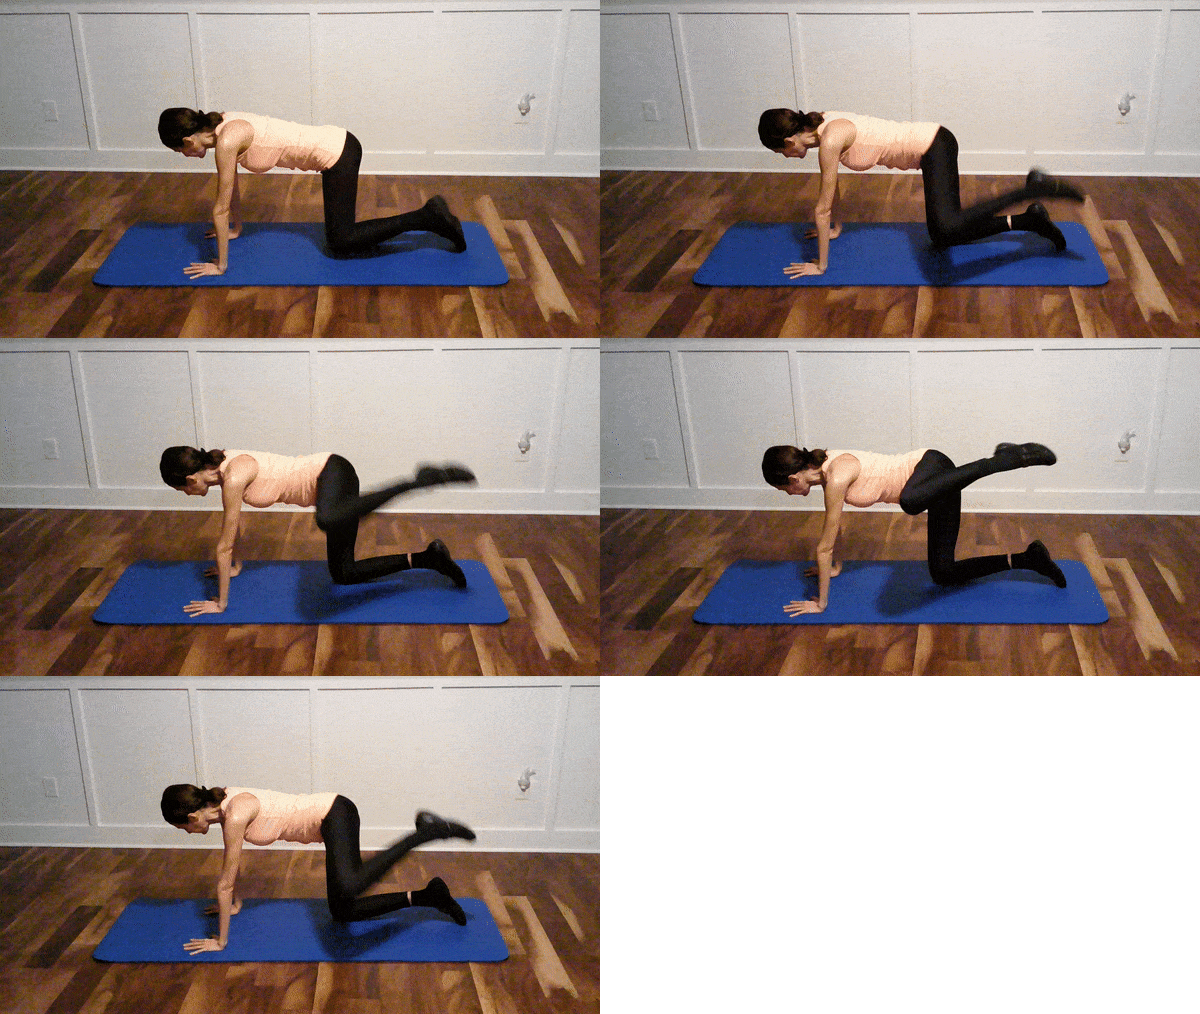 Click this link to watch the full Fire Hydrant Exercise video on YouTube.com
Suggested amount:
Beginner: 3 sets of 5 reps on each side
Intermediate: 3 sets of 10 reps on each side
Tips:
- Start out on all fours. For details on your starting position, see instructions for donkey kick above.
- Instead of moving one leg up behind you like in the donkey kick, you now keep your body stable and move one leg out to the side, just hinging at the hip and nowhere else.
- Keep the leg you’re moving elevated off the ground the whole time until you’re done with your set.
Muscles worked:
Glutes and core.
Video:
Check out core exercise fire hydrant by Children’s Hospital Colorado on YouTube.
Benefits:
- Sculpts glutes.
- Can help reduce back pain.
- Reduces hip dips (saddlebags).
6. Glute Bridge
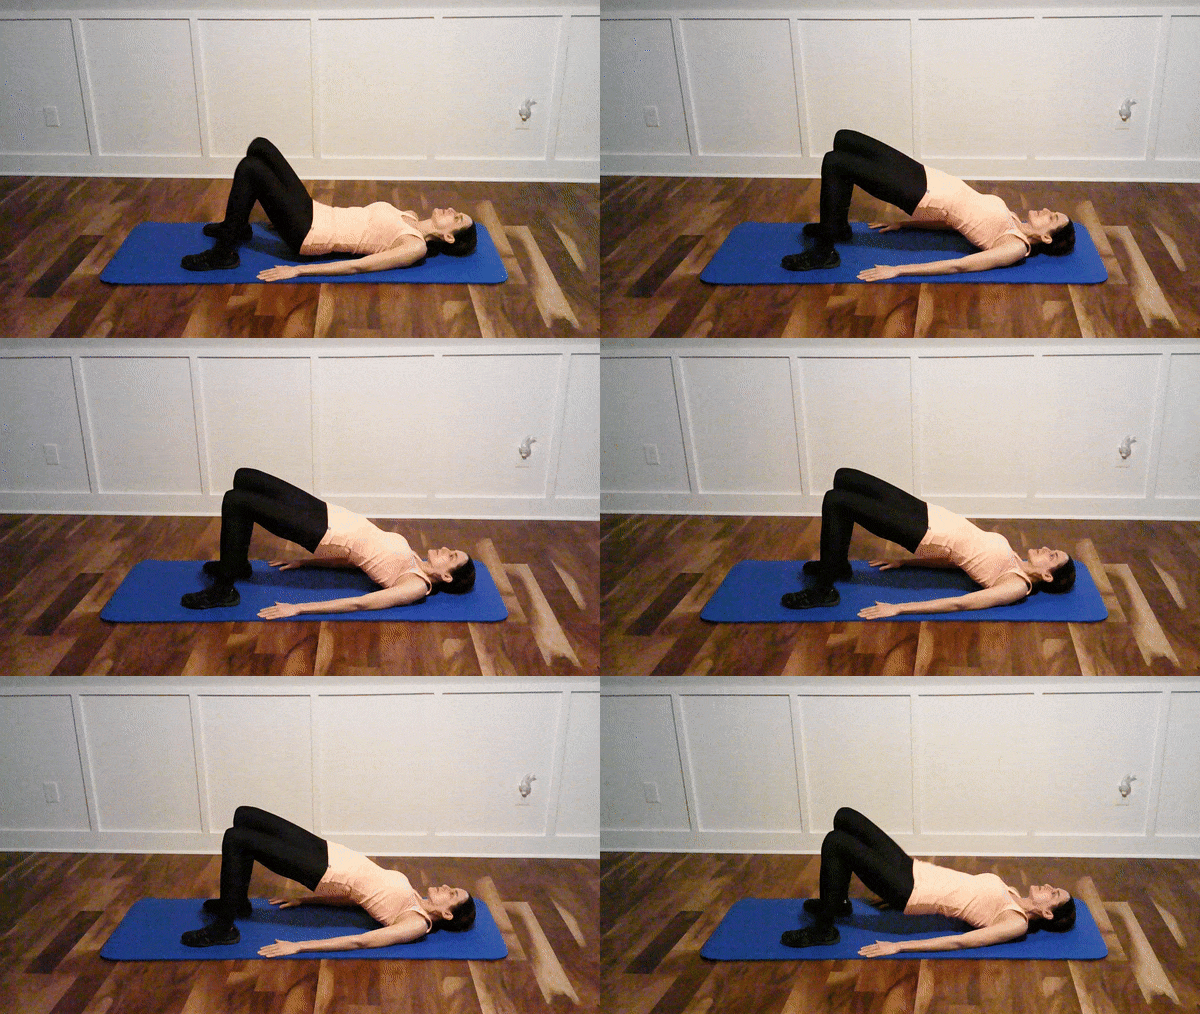 Click this link to watch the full Glute Bridge video on YouTube.com
Suggested amount:
Beginner: 3 sets of 5 reps (hold each rep in the raised hip position for about 5 seconds)
Intermediate: 3 sets of 10 reps
Tips:
- The correct place to mostly feel this exercise is in your glutes. Adjust the position of how forward or back your feet are planted on the floor to better engage your glutes.
- Squeeze your glutes to raise up your hips.
Muscles worked:
Hamstrings, lower back, abs, and glutes
Video:
Check out this YouTube video from the Mayo Clinic for an another perspective and more detail on how to perform this exercise.
Benefits:
- Gives you bigger and stronger glutes.
- Helps relieve knee and lower back pain
7. Bicycle Kicks
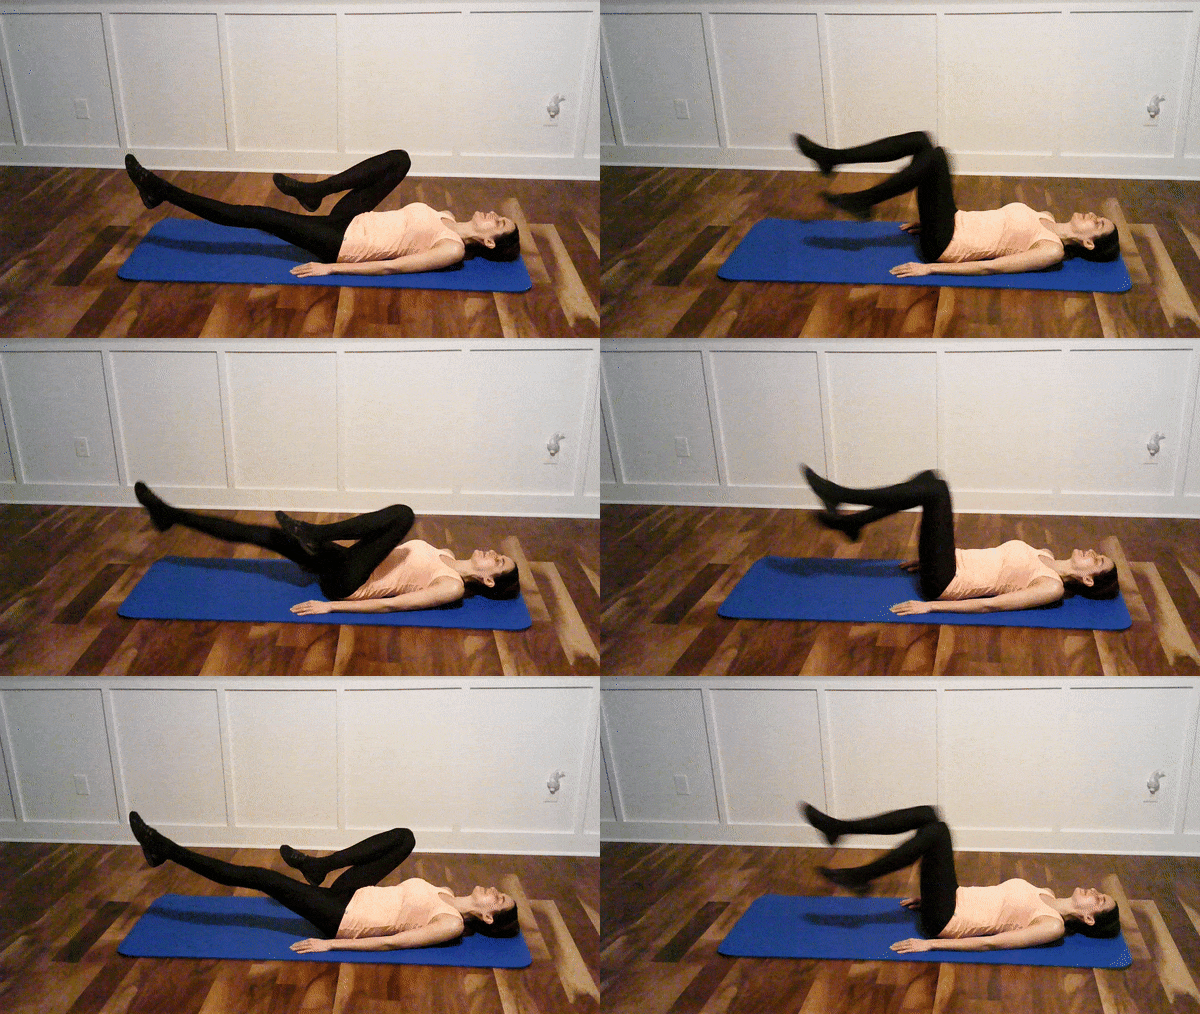 Click this link to watch the full Bicycle Kicks video on YouTube.com
Suggested amount:
Beginner: 2 sets of 10 reps (5 on each side)
Intermediate: 2 sets of 20 reps (10 on each side)
Tips:
- Lie flat on your back as you alternate kicking each leg forward and drawing it back in toward your chest.
- Keep your legs elevated off the ground the whole time.
- Optionally, you can also add a crunch to it by alternating each elbow to each opposite knee. This variation is a more advanced move.
Muscles worked:
Core, abs, hips, and obliques.
Video:
Check out how to do the bicycle by LiveStrong.com on YouTube.
Benefits:
- Strengthens and tightens your mid-section.
- Boosts your coordination.
8. Flutter Kicks
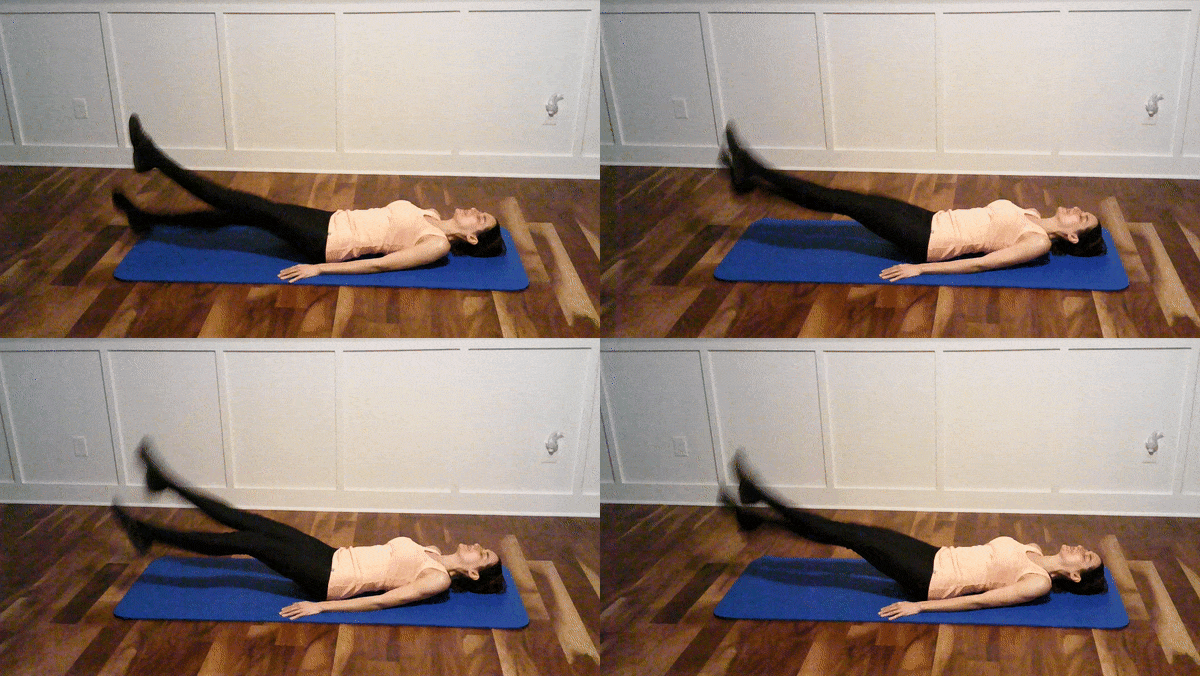 Click this link to watch the full Flutter Kicks video on YouTube.com
Suggested amount:
Beginner: 3 sets of 15 seconds
Intermediate: 3 sets of 30 seconds
Tips:
- Keep your head and back flat on the ground.
- Alternate moving each leg up and down a few inches off the ground.
- Keep your legs elevated above the ground the whole time.
- Point your toes the whole time for better stretch and stability.
- Keep your arms and hands flat on the ground alongside your body.
- Flutter your legs only a few inches off the ground. Don’t raise your legs too high to keep the focus on your abs.
Muscles worked:
Core, abs, and hip flexors.
Video:
Check out how to do leg flutters or flutter kicks workout by Howcast on YouTube.
Benefits:
- More defined abs
- Strengthens your core
9. Dead Bug Exercises
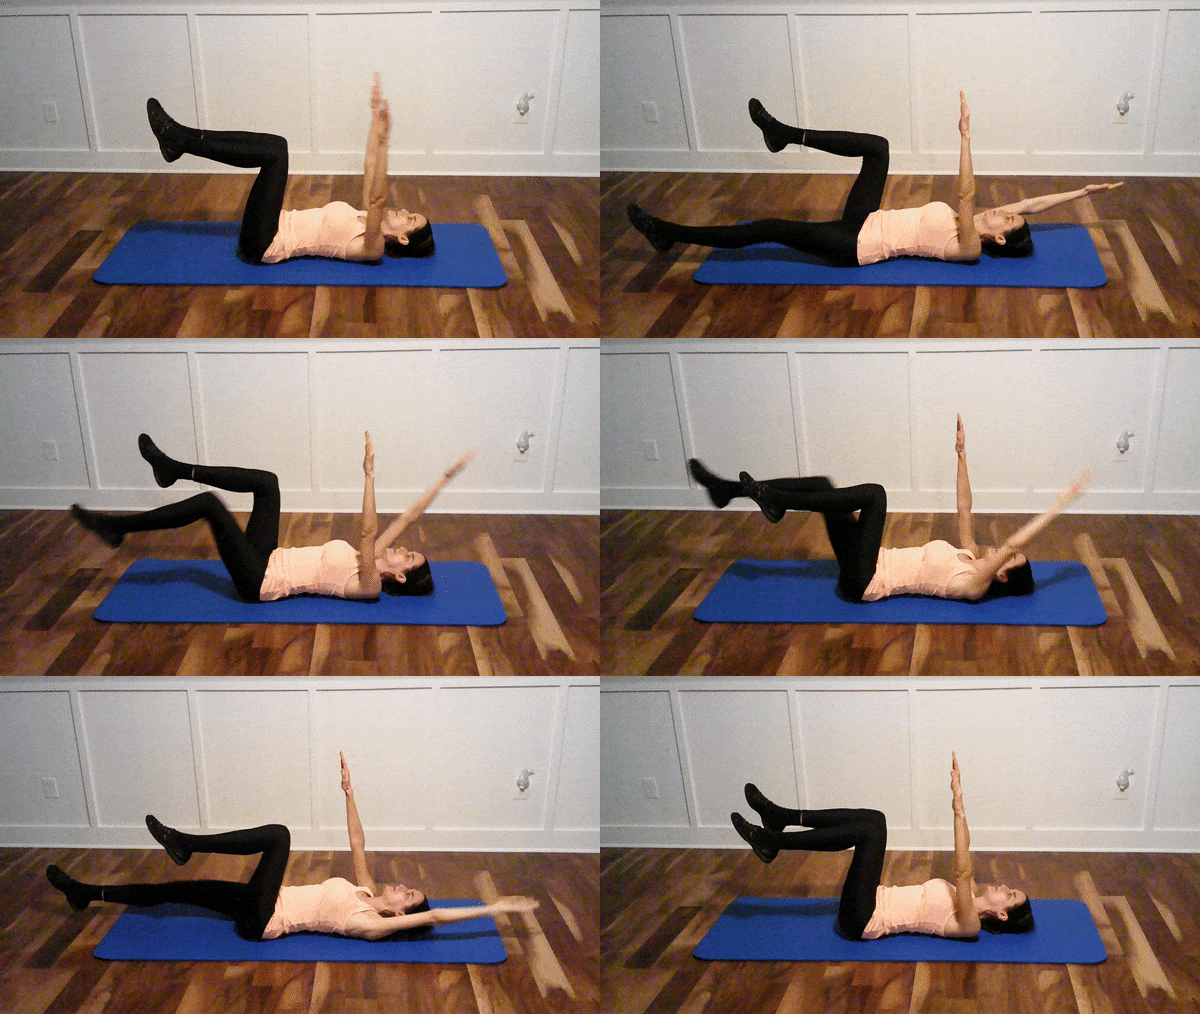 Click this link to watch the full Dead Bug Exercises video on YouTube.com
Suggested amount:
Beginner: 3 sets of 5 reps on each side
Intermediate: 3 sets of 10 reps on each side
Tips:
- Keep your back, head, and neck flat on the floor the whole time.
- Start with your knees elevated at a 90 degree angel and your arms straight out in front of you up in the air.
- Do not let your legs or hands touch the the floor until all of your reps and sets are complete.
- The opposite leg and arm are stretched out at the same time and then brought back to the starting position at the same time.
Muscles worked:
Back, obliques, and abs.
Video:
Check out core exercise dead bug by Children’s Hospital Colorado on YouTube.
Benefits:
- Helps relieve and prevent lower back pain
- Improves balance and coordination
10. Side Lying Hip Abduction
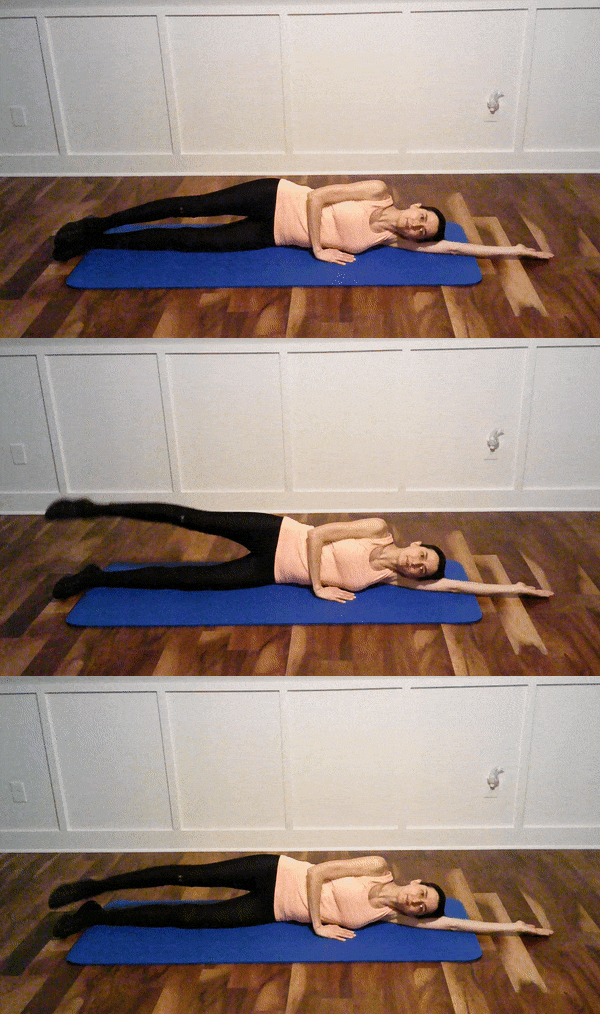 Click this link to watch the full Side Lying Hip Abduction video on YouTube.com
Suggested amount:
Beginner: 3 sets of 5 reps on each side
Intermediate: 3 sets of 10 reps on each side
Tips:
- Do not raise your leg much higher than your hips to maintain the focus on the side of your thighs.
- You are only raising each leg a few inches.
Muscles worked:
Glutes and hip flexors.
Video:
Check out how to exercise your hip abductors & adductors: pilates, stretching & abs by eHow Fitness on YouTube.
Benefits:
- Help reduce hip dips (saddlebags).
- Strengthen your hips for better balance and less knee pain. This is a popular pilates exercise.
11. Side Lying Hip Adduction
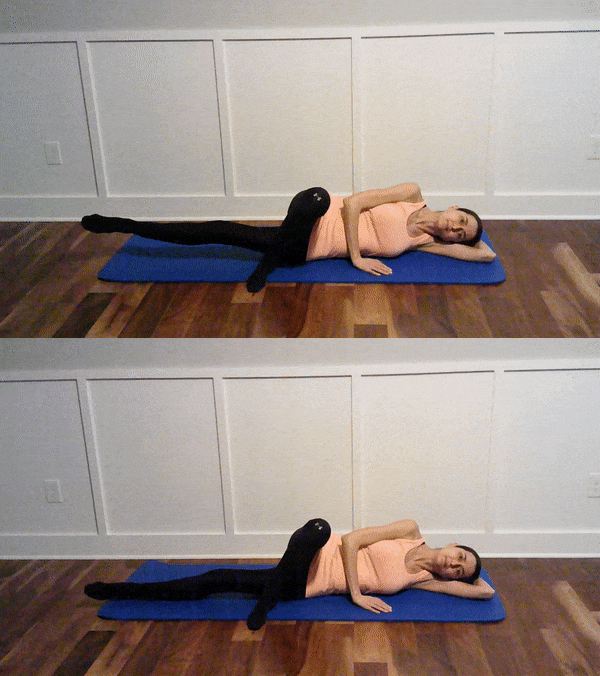 Click this link to watch the full Side Lying Hip Adduction video on YouTube.com
Suggested amount:
Beginner: 3 sets of 3 reps on each side. Hold your leg up during each rep for a count of 3.
Intermediate: 3 sets of 5 reps on each side. Hold each rep for a count of 5.
Tips:
Lie down in a straight line.
Try to not let your hips roll forward or back on the floor as you lift your leg.
Video:
Check out side lying hip adduction by Baptist Health SF on YouTube.
Muscles worked:
Inner thigh muscles.
Benefits:
- Strengthens and tones your inner thighs.
12. Warrior Pose 1 with Swaying
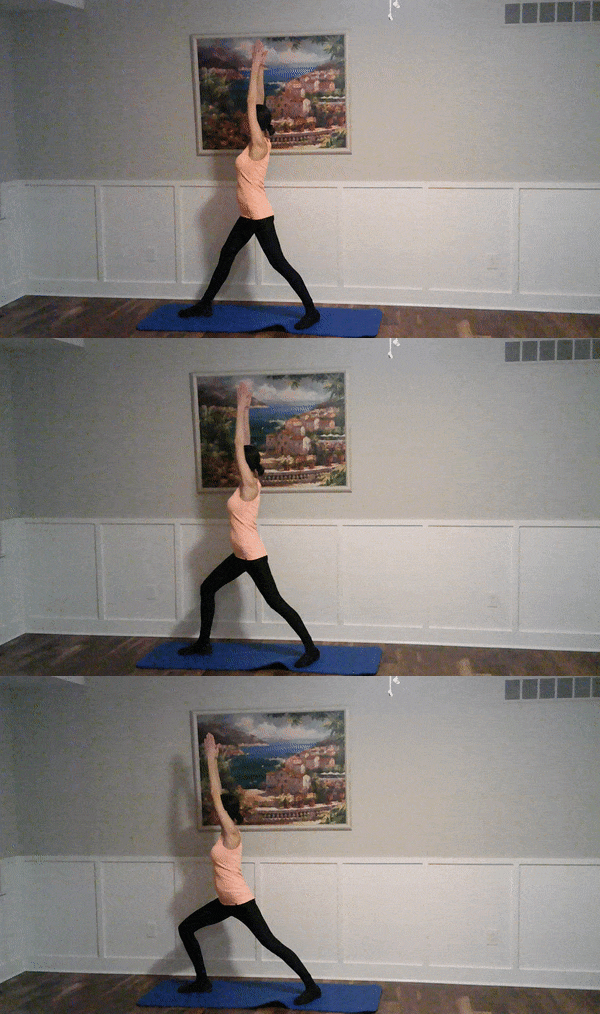 Click this link to watch the full Warrior Pose 1 with Swaying video on YouTube.com
Suggested amount:
Beginner and Intermediate: About 30 seconds on each side.
Tips:
- Keep your feet in a straight line to each other. It may help to draw an imaginary line from one heel to the other to make sure they are mostly aligned to each other.
- Try to not lunge so far forward that your front knee goes past your toes.
- While you hold the pose, gently sway back and forth a few inches to enter a lunge and straighten both legs back up.
Video:
Check out how to do virabhadrasana 1 (warrior 1 pose) by Ventuno Yoga on YouTube.
Muscles worked:
Helps you stretch your quads, hamstrings, chest, back, and arms.
Benefits:
- Very relaxing and comforting
- Helps you practice maintaining balance while in motion
- Arguably more fun than stationary warrior pose 1
13. Squats
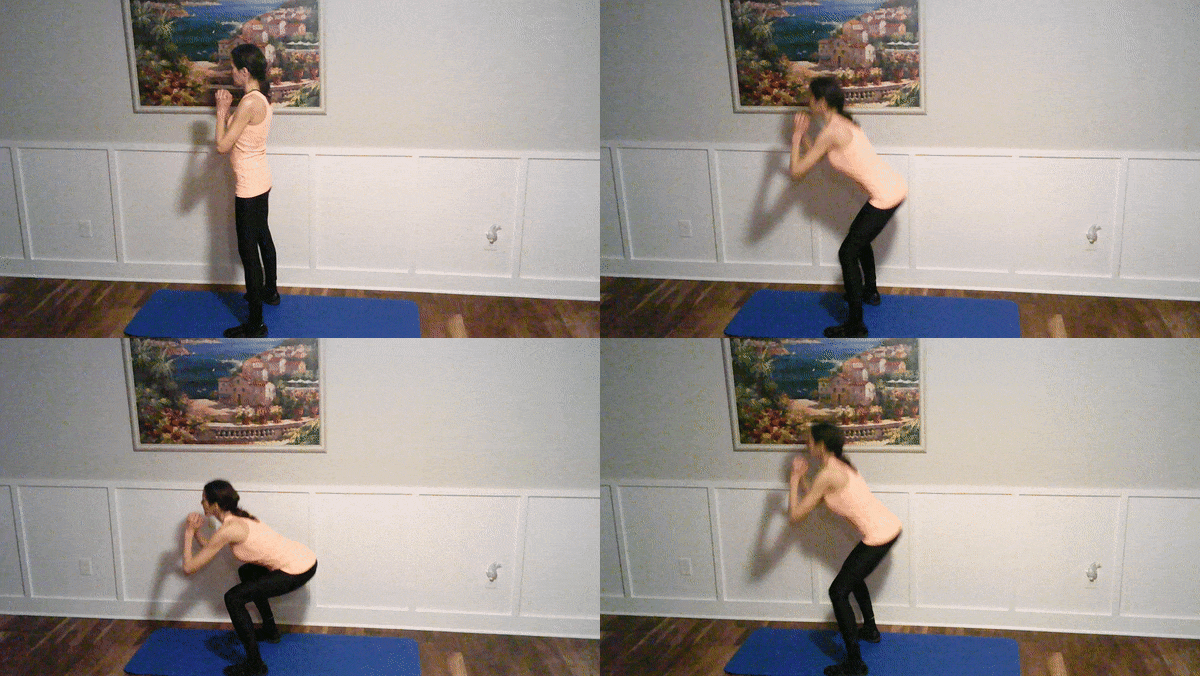 Click this link to watch the full Squats video on YouTube.com
Suggested amount:
Beginner: 3 sets of 5 reps
Intermediate: 3 sets of 10 reps
Tips:
- Push your butt out behind you as you squat down to keep your back straight and make sure your knees do not go past your toes.
- Keep your feet flat on the ground the whole time.
- Push back up from your heels and not your toes to keep the focus on your glutes.
- Keeping your arms in front of you with your hands clasped together may help you maintain balance.
Muscles worked:
Glutes, quads (front of the thigh), hamstrings (back of the thigh), hip flexors, and calves.
Video:
Check out squats for beginners by Bowflex® on YouTube.
Benefits:
- Strengthens your core and lower body muscles.
- Squats burn calories and may help you lose weight.
- Squats help prevent knee and ankle injuries.
14. Side Squats
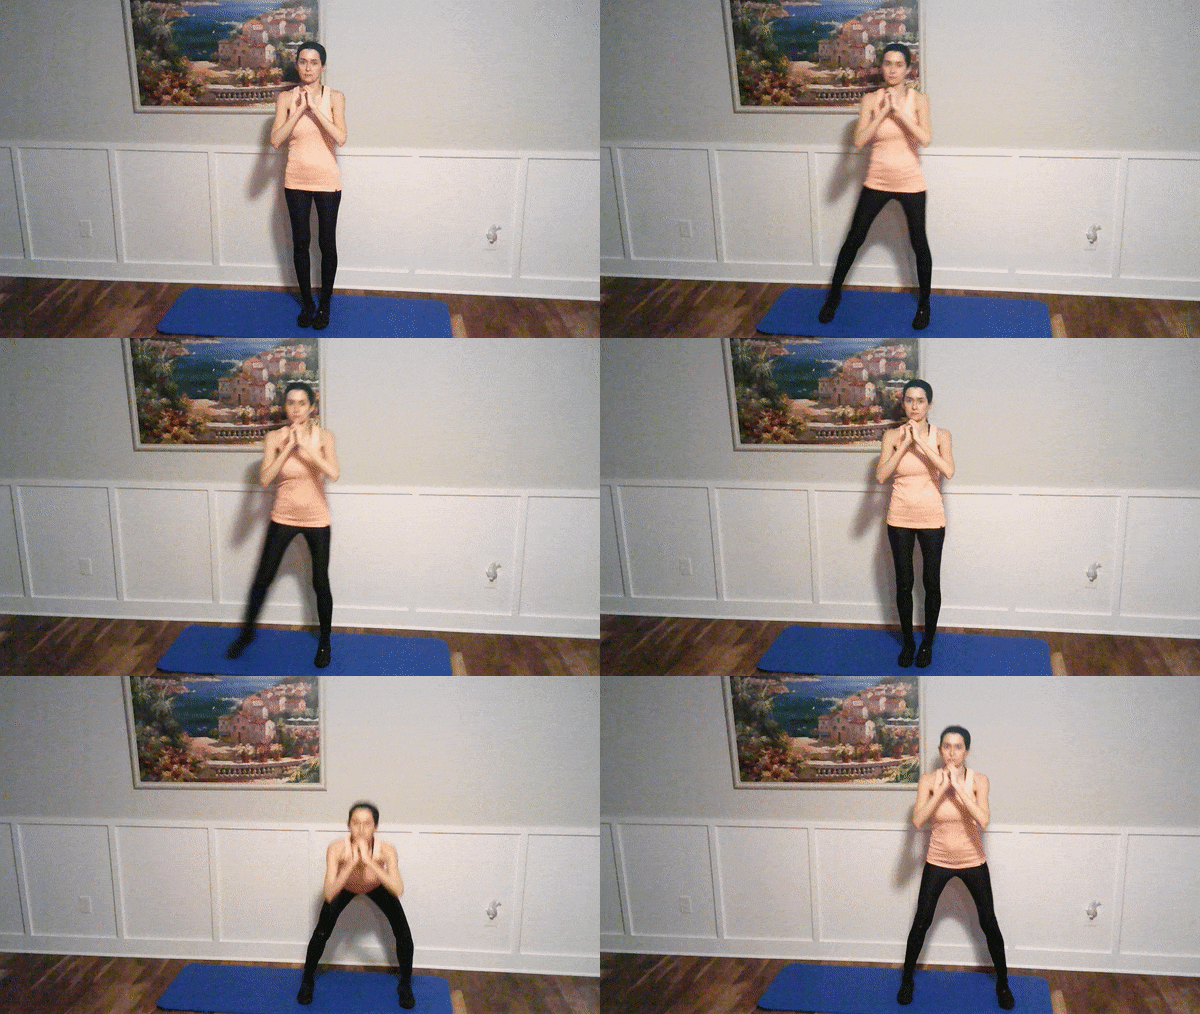 Click this link to watch the full Side Squats video on YouTube.com
Suggested amount:
Beginner: 2 sets of 2 on each side
Intermediate: 3 sets of 5 on each side
Tips:
- Squat down as low as you are comfortable, as long as your knees do not go past your toes.
- Push your butt out behind you when you squat down to help ensure your knees don’t go past your toes.
- Bend at both knees when you step to the side and squat.
- Step to the side until your feet are about shoulder width apart.
Muscles worked:
Legs, glutes, and outer thighs.
Video:
Check out how to do side squats with proper form by Get Healthy U TV with Chris Freytag on YouTube.
Benefits:
- Adds a side movement to your workout. Most workouts are forward and back.
- Improves balance, stability, and coordination.
- Helps reduce hip dips (saddlebags).
15. Chair Mountain Climbers
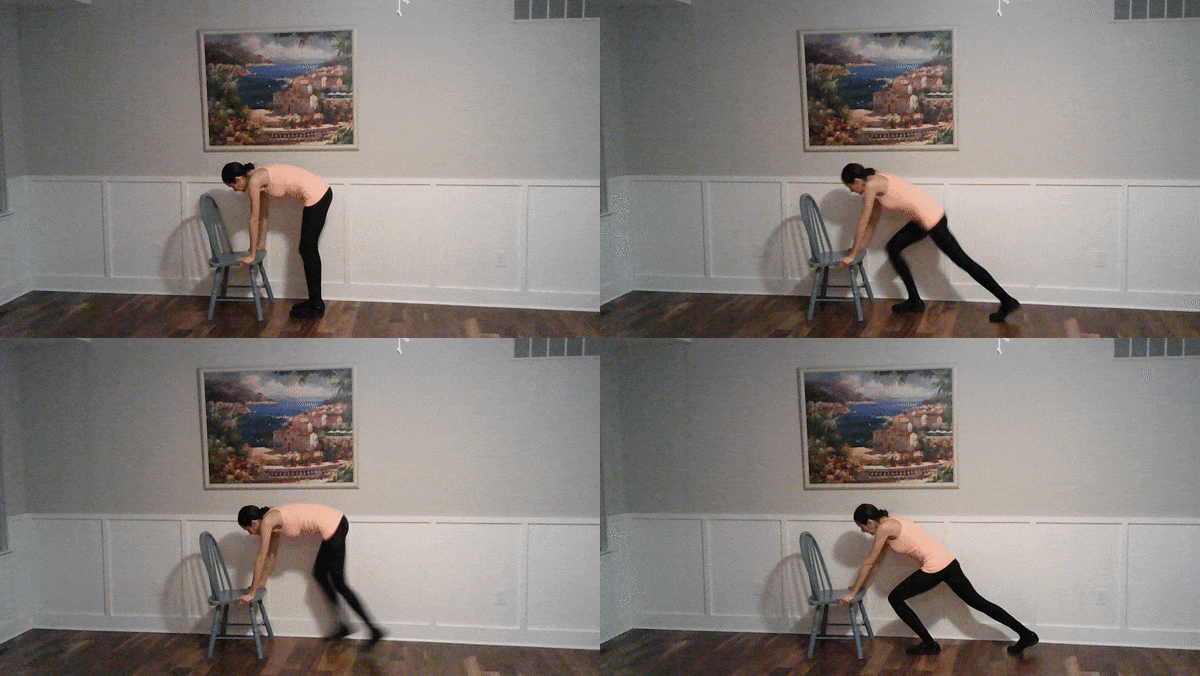 Click this link to watch the full Chair Mountain Climbers video on YouTube.com
Suggested amount:
Beginner: 3 sets of 10 reps on each side
Intermediate: 3 sets of 20 reps on each side
Tips:
- Place the chair on a yoga mat to prevent it from moving.
- You can also use a desk or counter or the back or side of a couch instead of a chair. Gripping the sides of a chair seat may be the most comfortable though on your hands.
- Step back far enough to try to avoid having your front knee go past your toes.
Muscles worked:
Arms, chest, abs, obliques, quads, hamstrings, and hips.
Video:
Check out beginner chair mountain climbers by Rundle Fit on YouTube.
Benefits:
- Chair mountain climbers reduces stress on wrists and amount of weight you are lifting compared to floor mountain climbers.
- Almost a total body workout in one exercise.
- Builds endurance, core strength, and agility.
16. Box Toe Taps
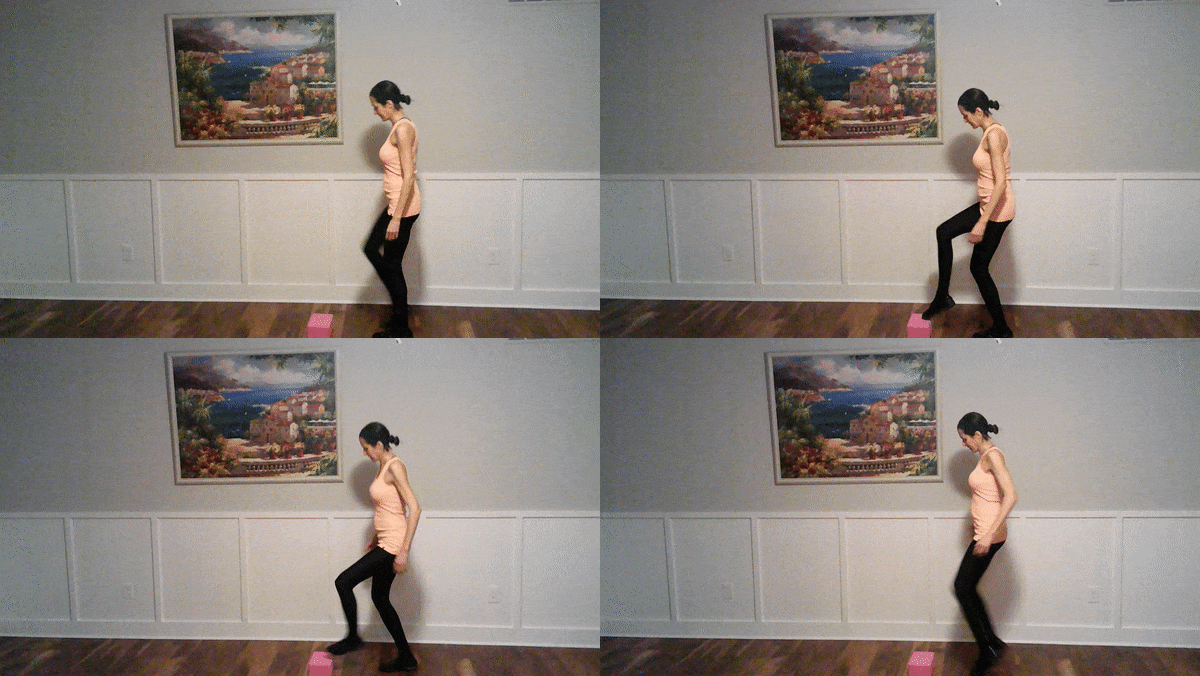 Click this link to watch the full Toe Taps video on YouTube.com
Suggested amount:
Beginner: 3 sets of 10 reps (5 reps with each foot)
Intermediate: 3 sets of 30 reps (15 reps with each foot)
Tips:
- Touch your toes lightly on the box.
- A yoga block is used in this above example. You can use almost any box around the house, such as a storage box or cardboard box.
- Maintain a straight back.
- Keep it moving. Do not stop once you start a set. Tap, tap, tap…
Muscles worked:
Core, thighs, hamstrings, hips, glutes, calves, and cardio.
Video:
Check out this Box Toe Taps YouTube video by Xceler8 Athletics
Benefits:
- Improves your speed, balance, and foot skills
17. Desk Push Ups
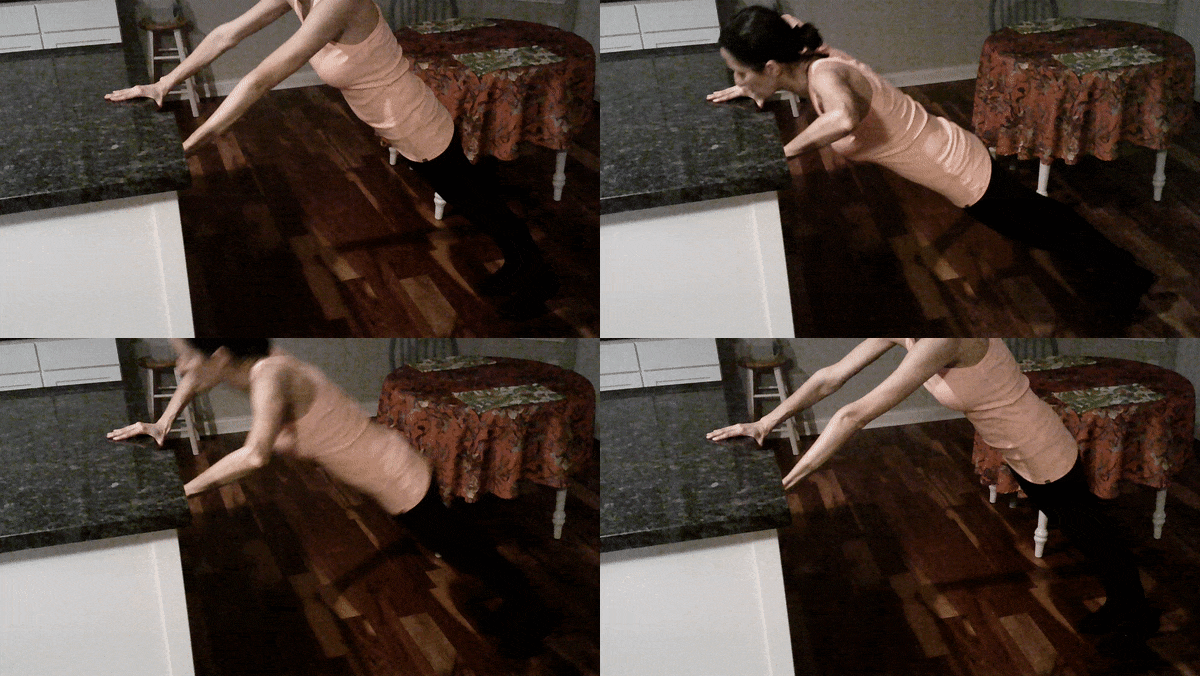 Click this link to watch the full Desk Push Ups video on YouTube.com
Suggested amount:
Beginner: 3 sets of 5 reps
Intermediate: 3 sets of 10 reps
Tips:
- You can use any stable surface to hold onto, such as a table, desk, or the back of a couch.
- Keep your back and butt in a straight line with your legs.
- Bend only at the elbows to lower yourself and push yourself back up by straightening your elbows.
- Keep your hands about shoulder width apart.
Muscles worked:
Chest, upper and middle back muscles, biceps, and triceps.
Video:
Check out this YouTube video from Mountau Burn Club for an another viewpoint and more detail on how to perform this exercise.
Benefits:
- Puts much less stress on your elbows and wrists than floor push ups.
- Reduces the amount of weight you are lifting compared to regular push ups.
- Great exercise for people who have trouble doing a standard push up. This desk push up exercise can make your muscles stronger so that you can eventually do a floor push up.
18. Wall Sit
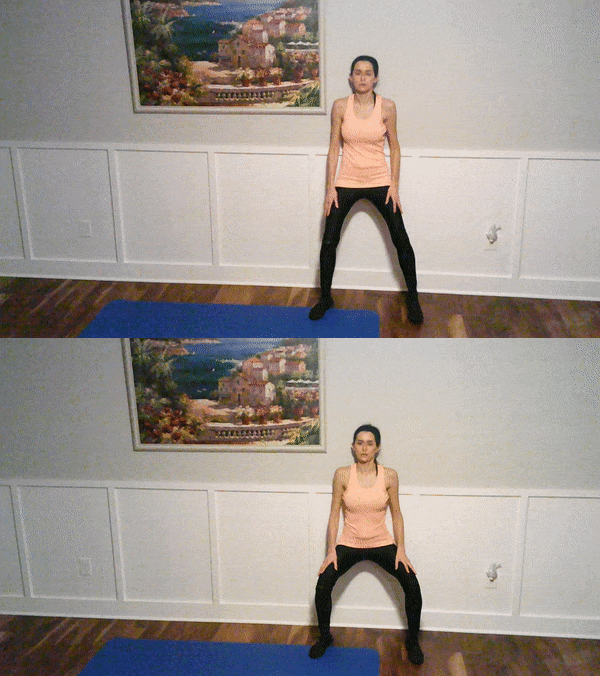 Click this link to watch the full Wall Sit video on YouTube.com
Suggested amount:
Beginner: 3 sets of 10 seconds
Intermediate: 3 sets of 30 seconds
Tips:
- Press your back flat and straight against the wall
- Hold your position steady.
- Place your feet firmly on the ground and use them to push yourself back into the wall more firmly.
- Align your knees with your ankles.
- Slide your back down the wall until the back of your knees are at about a 90 degree angle
Muscles worked:
Glutes, calves, and quads.
Video:
Check out how to do a wall sit thighs workout by Howcast on YouTube.
Benefits:
- Builds strength and endurance
- Great way to end a leg workout day.
Fitness to Do at Home | Intermediate Level Exercises
1. High Plank
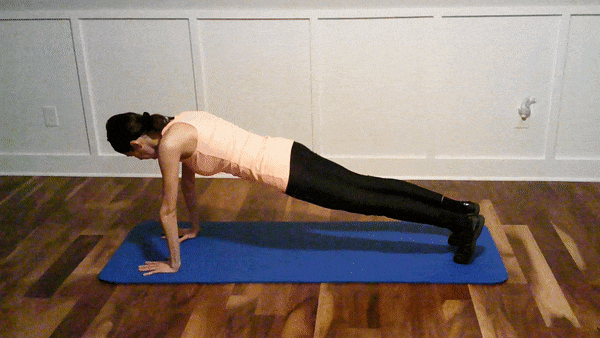 Click this link to watch the full High Plank video on YouTube.com
Suggested amount:
Beginner: 3 sets of 10 seconds
Intermediate: 3 sets of 30 seconds
Tips:
- You can start on all fours on the ground and gradually push each leg and hand into position.
- Maintain a straight line, even if it’s a straight diagonal line, from your head, neck, back, butt, legs and heels.
- Keep your hands directly below your shoulders.
- Spread out the fingers on your hands to distribute your weight more evenly across your hands and reduce pressure on your wrists.
Muscles worked:
Abs, core, obliques, arms, shoulders, triceps. Works more muscles than the forearm plank, but the forearm plank focuses more on core muscles.
Video:
Check out Do It Right – High Plank by Denise Austin on YouTube.
Benefits:
- Plank strengthens your spine, back, and abdominal muscles.
- Helps improve your posture and flexibility.
- Helps reduce back pain and flattens your belly.
2. Plank Leg Lifts
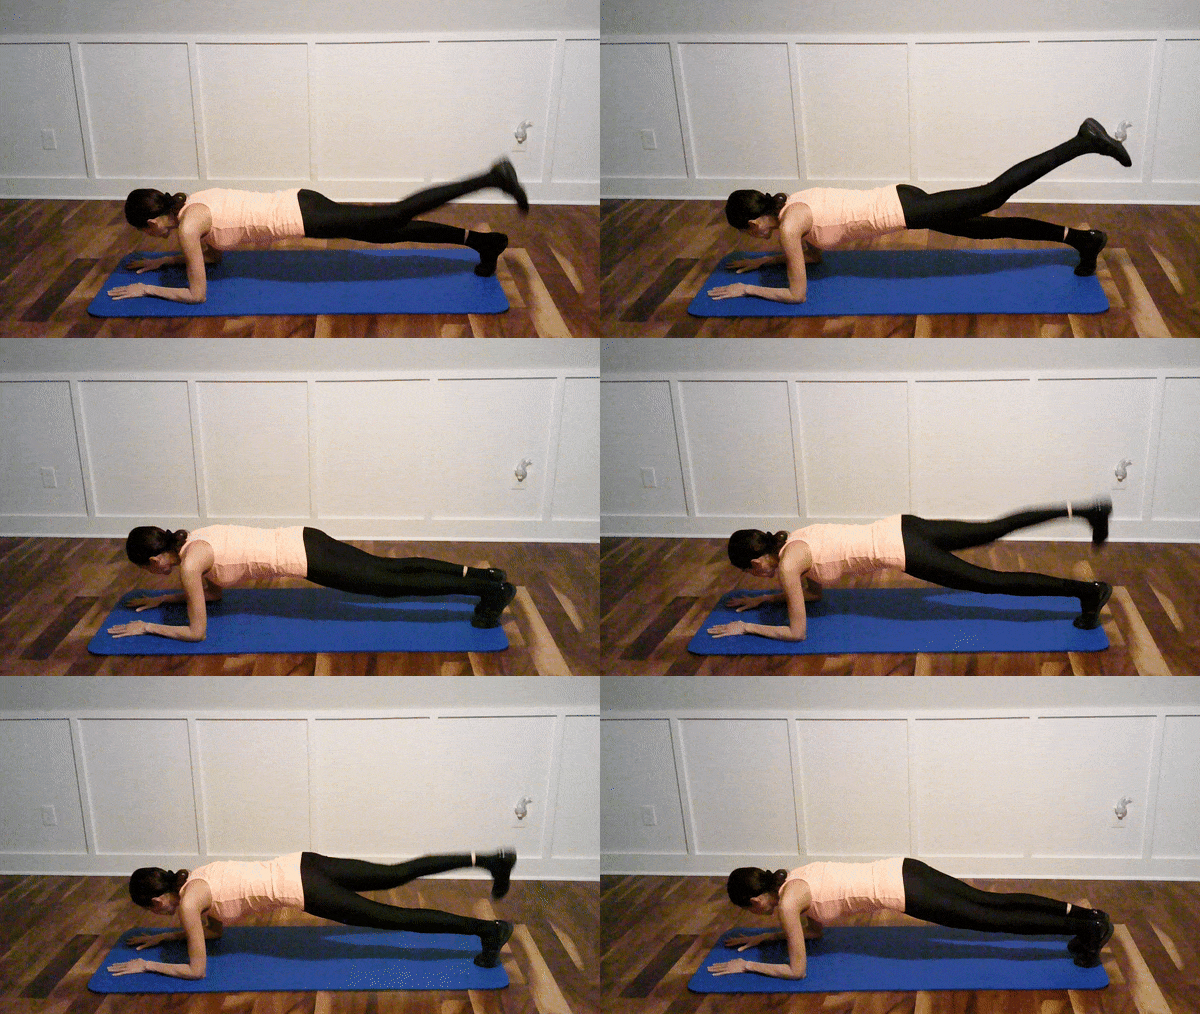 Click this link to watch the full Plank Leg Lifts video on YouTube.com
Suggested amount:
Beginner: 3 sets of 6 reps (3 reps with each leg)
Intermediate: 3 sets of 10 reps (5 reps with each leg)
Tips:
- The forearm plank used in this example above takes pressure off the wrists and may be an easier posture for more people to hold. Place your elbows directly below your shoulders.
- If you decide to do this as a straight arm hand plank, keep your fingers spread far apart on the floor to distribute your weight evenly across your hands and reduce stress on your wrists.
- Try to keep your head, neck, back and butt mostly in a straight line.
- You don’t have to raise your leg that high. You can raise your leg just high enough to keep it level with your butt.
Muscles worked:
Glutes, abs, core hamstrings, quads. (A hand plank would also engage your arm and shoulder muscles more.)
Video:
Check out plank leg raises by DAREBEE on YouTube.
Benefits:
- Plank leg raises strengthen your ab muscles more than regular planks.
- Strengthening your core gives you better balance, posture, and a healthier back.
3. Plank with Alternating Knee to Elbow
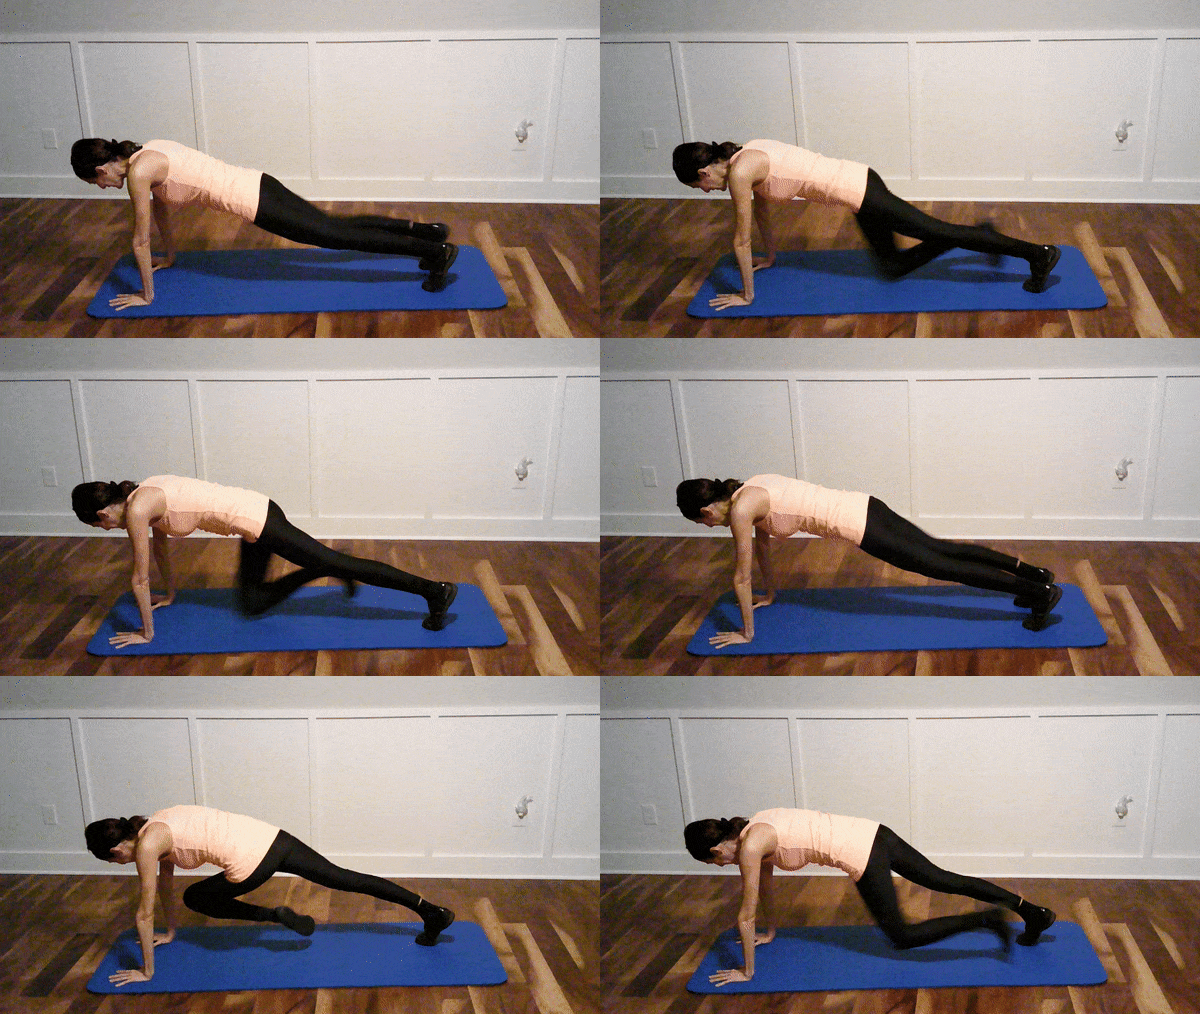 Click this link to watch the full Plank with Alternating Knee to Elbow video on YouTube.com
Suggested amount:
Beginner: 3 sets of 6 reps (3 reps on each side)
Intermediate: 3 sets of 20 reps (10 reps on each side)
Tips:
- Start in a straight arm hand plank position.
- Keep your hands directly under your shoulders
- Keep your back flat.
- Keep your butt in line with your back.
- Bend each knee towards the opposite elbow, but no need to make contact between the knee and elbow.
Muscles worked:
Abs, obliques, shoulders, hip flexors, glutes, core, quads.
Video:
Check out plank knee twist by Carna Vita on YouTube.
Benefits:
- This is a more difficult variation of the high plank.
- Targets more muscles than the high plank.
- Increases stability, balance, and coordination.
4. Bird Dog Exercise
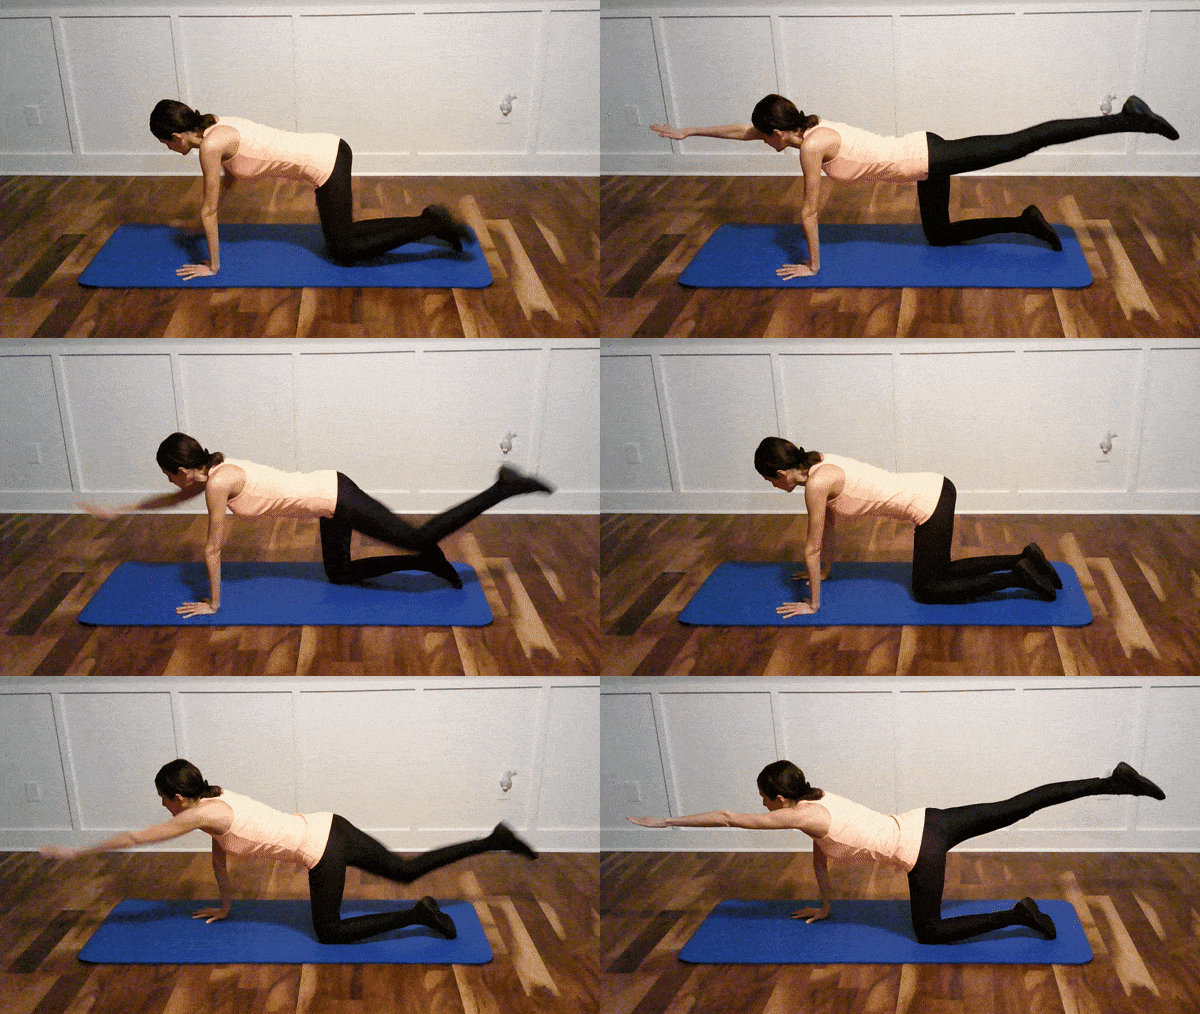 Click this link to watch the full Bird Dog Exercise video on YouTube.com
Suggested amount:
Beginner: 3 sets of 5 reps on each side
Intermediate: 3 sets of 10 reps on each side
Tips:
- Start out on all fours. Hands with fingers spread out directly beneath the shoulders. Knees directly below your hips.
- Use a yoga mat to cushion your knees and hands.
- Kick one leg out straight behind you, keeping the straight leg level with your back. Point your toe for stability and stretch. Bring your opposite arm out in front of you stretched out straight ahead.
- Keep your back straight.
- Hold the pose for a count of at least 3 seconds before returning to your starting position.
Muscles worked:
Back, core, abs, and glutes.
Video:
Check out how to do the bird dog exercise abs workout by Howcast on YouTube.
Benefits:
- Improves stability.
- Increases range of motion.
5. Single Leg Glute Bridge
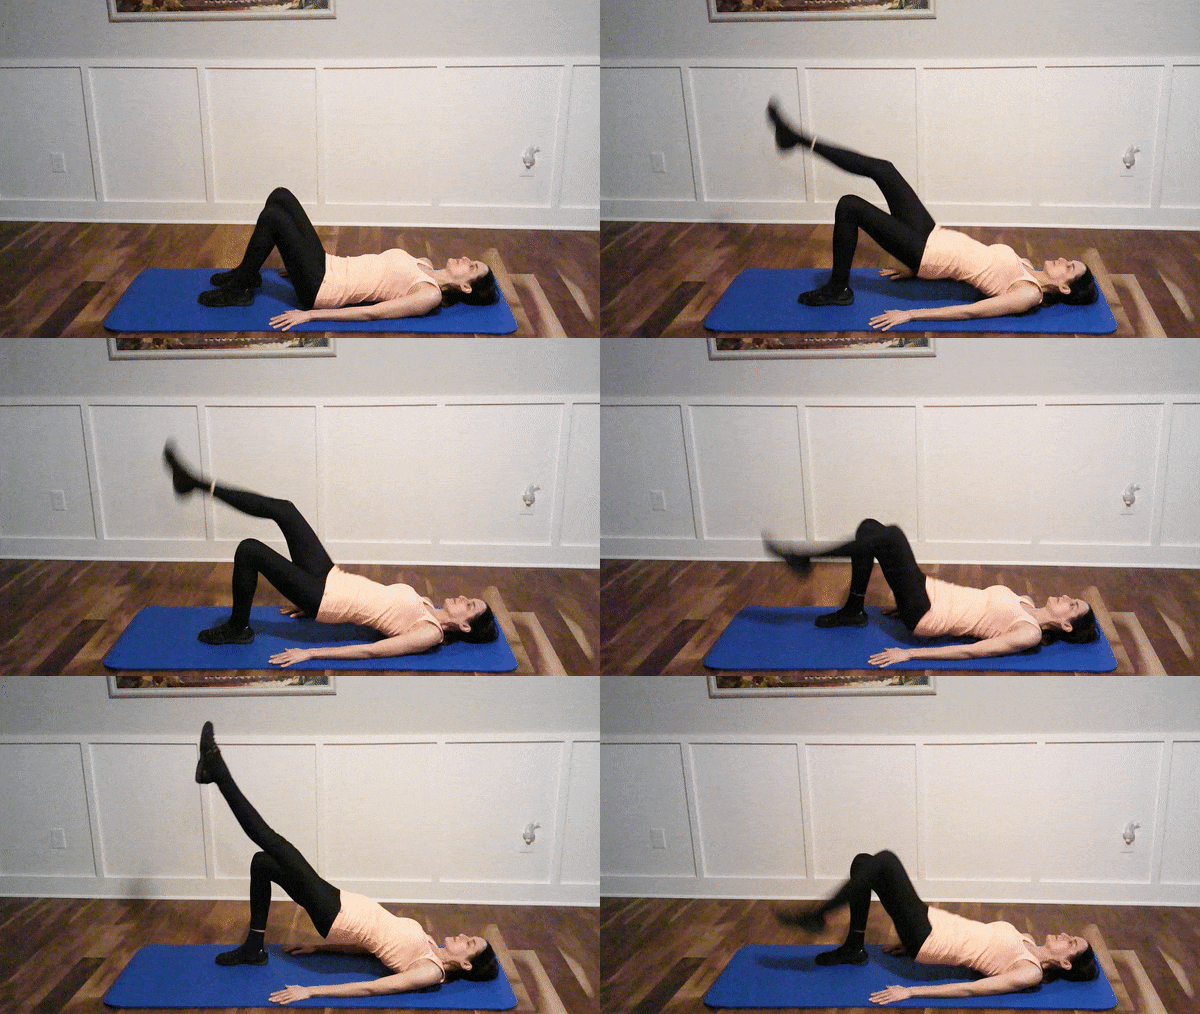 Click this link to watch the full Single Leg Glute Bridge video on YouTube.com
Suggested amount:
Beginner: 3 sets of 10 reps (5 reps on each side)
Intermediate: 3 sets of 20 (10 reps on each side)
Tips:
- Keep your head, back and arms flat on the floor.
- Bend one knee and place that foot flat on the ground. Raise your other leg in the air until the raised leg is straight with no bend in the knee. Squeeze your glutes until your hips raise up off the ground. Release your glutes to lower your hips back to the ground. For a more challenging workout, you can lower your hips but always keep you hips an inch off the ground to never let them fully rest until all your reps are done.
Muscles worked:
targets all three glute muscles, hamstrings, lower back.
Video:
Check out the single leg glute bridge by Orillia Sports Medicine and Rehabilitation on YouTube.
Benefits:
- Alternative exercise for people who have trouble squatting but still want to work their glutes.
6. Russian Twist
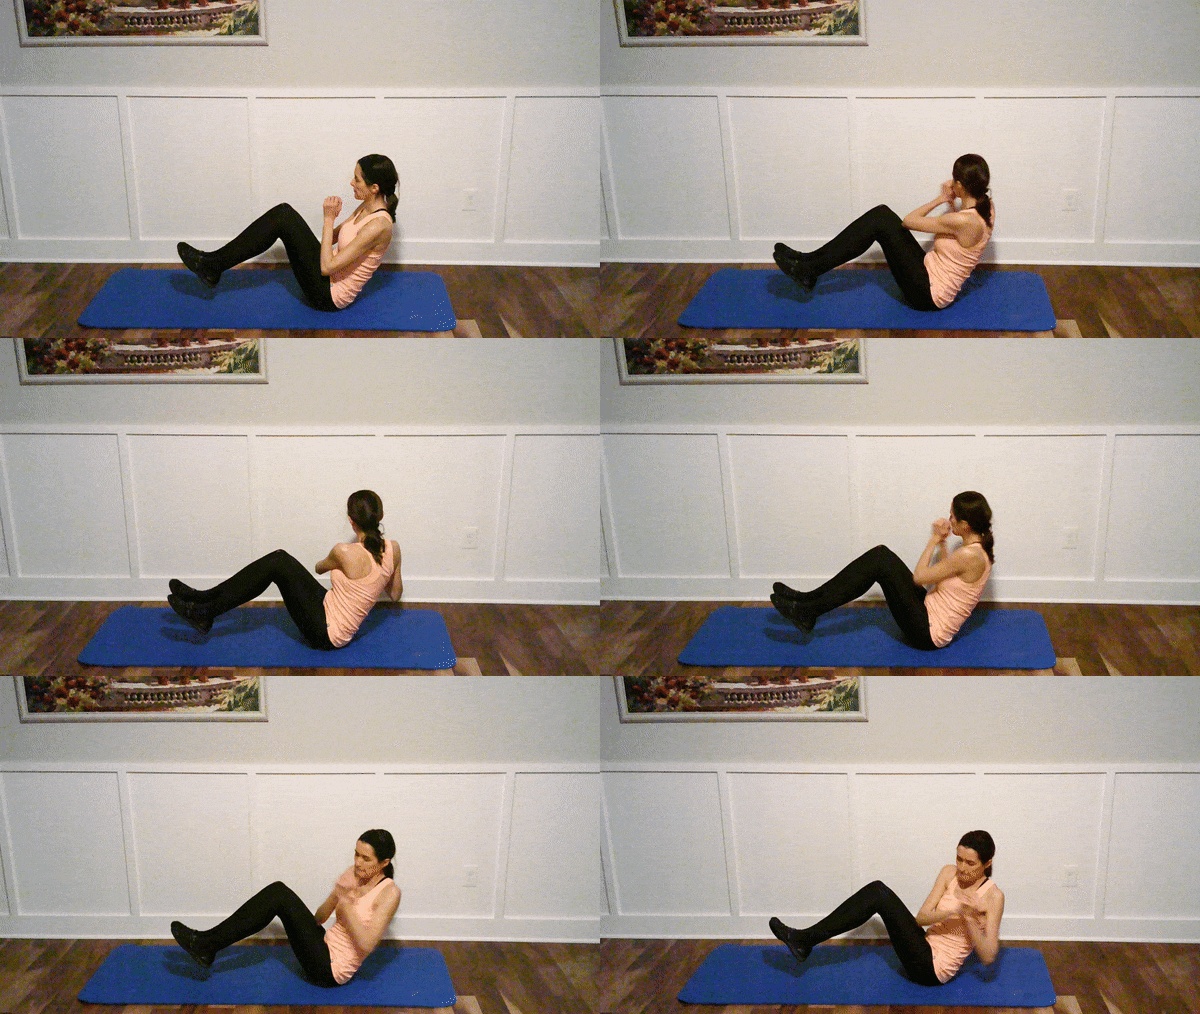 Click this link to watch the full Russian Twist video on YouTube.com
Suggested amount:
Beginner: 3 sets of 6 reps (3 on each side)
Intermediate: 3 sets of 10 reps (5 on each side)
Tips:
- Keep your back straight. Avoid slouching and rounding your back.
- Keep your feet elevated a few inches off the ground the whole time.
- Keep your knees bent at a 45 degree angle.
- Keep your hands clasped together for stability and twist steadily from side to side.
- Twist your torso not your head.
- Twist your torso and neck as a single unit at the same time in the same direction.
Muscles worked:
Obliques, abs, hip flexors, and back.
Video:
Check out how to do a Russian twist ab workout by Howcast on YouTube.
Benefits:
- Tones midsection.
- Helps get rid of love handles.
- Increases core strength.
7. Downward Dog to Plank
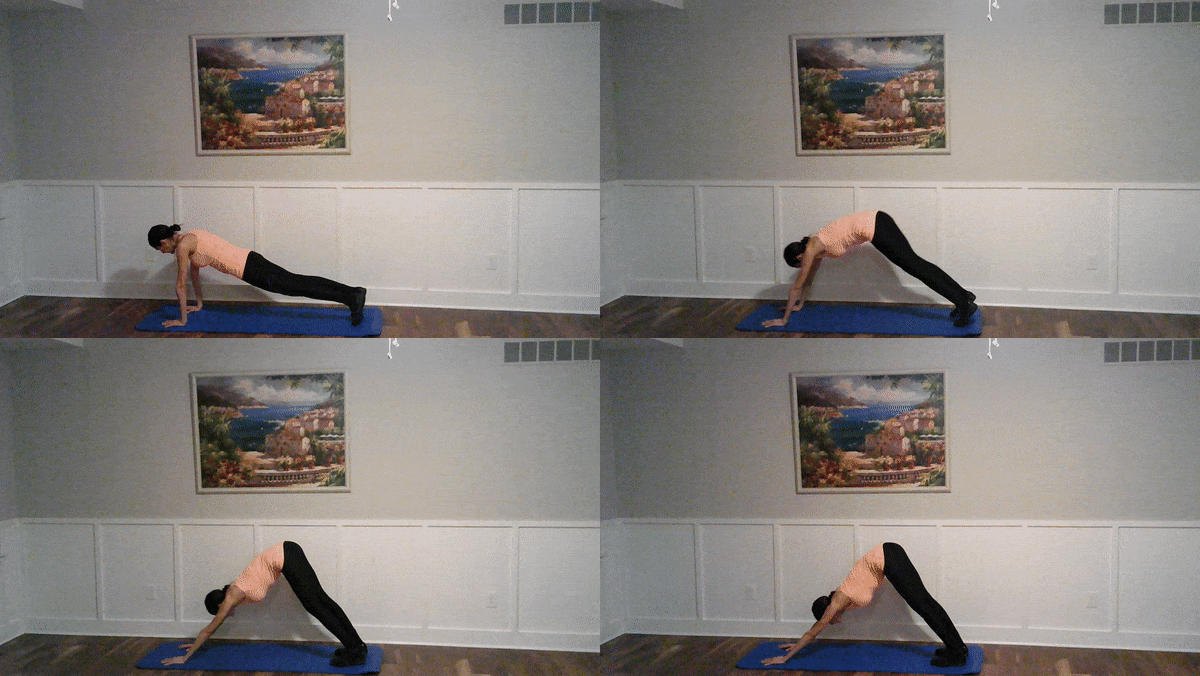 Click this link to watch the full Downward Dog to Plank video on YouTube.com
Suggested amount:
Beginner: Hold each pose for at least 5 seconds
Intermediate: Hold each pose for at least 10 seconds
Tips:
- Downward dog: Keep your back as straight at you can. Straighten your knees as much as you can. Push backwards from your hands onto your feet. This pose has a backwards stretch you can feel in the backs of your legs especially.
- High Plank: See high plank tips above.
- Gently lower yourself down from downward dog into plank, especially using the strength of your upper body muscles. Gently push yourself back into downward dog from plank especially using your upper body muscles.
Muscles worked:
Downward dog: Hips, hamstrings, and calves.
High Plank: Abs, back, and shoulders.
Video:
Check out the down dog to plank by I.AM.YOU. Studio on YouTube.
Benefits:
- Strengthens the whole body.
- Calms the mind.
- Stimulates blood circulation.
8. Jumping Squat Thrust (Burpees Without Push Up)
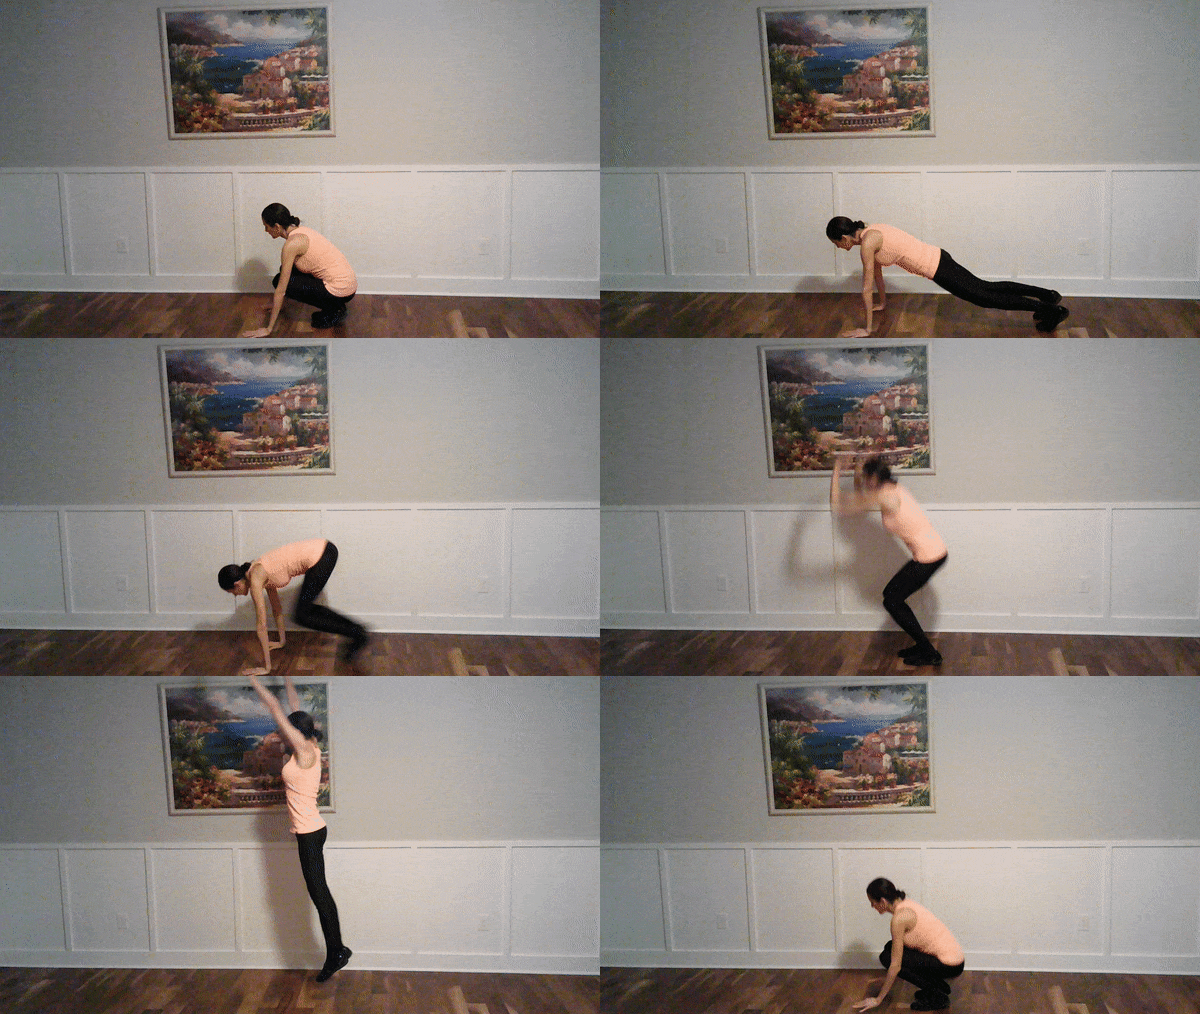 Click this link to watch the full Jumping Squat Thrust | Burpees Without Push Ups video on YouTube.com
Suggested amount:
Beginner: 3 sets of 5
Intermediate: 3 sets of 10
Tips:
- Start in a squat position with your feet flat on the floor and your hands and fingers wide open and flat on the floor.
- Shoot your legs back behind you until you are in a push up position with your hands under your shoulders with a straight back.
- Jump forward back into the squat position with your hands and feet flat on the ground.
- Jump up from your squat position to a standing position. Gently lower yourself back down to the starting squat position.
Muscles worked:
Almost every muscle group. Primary muscles are hamstrings, quads, and glutes.
Video:
Check out how to do a jumping squat thrust | warrior fitness by Howcast on YouTube.
Benefits:
- Fat burning and toning.
- Builds muscle, strength, and endurance
9. Lunge Torso Twist
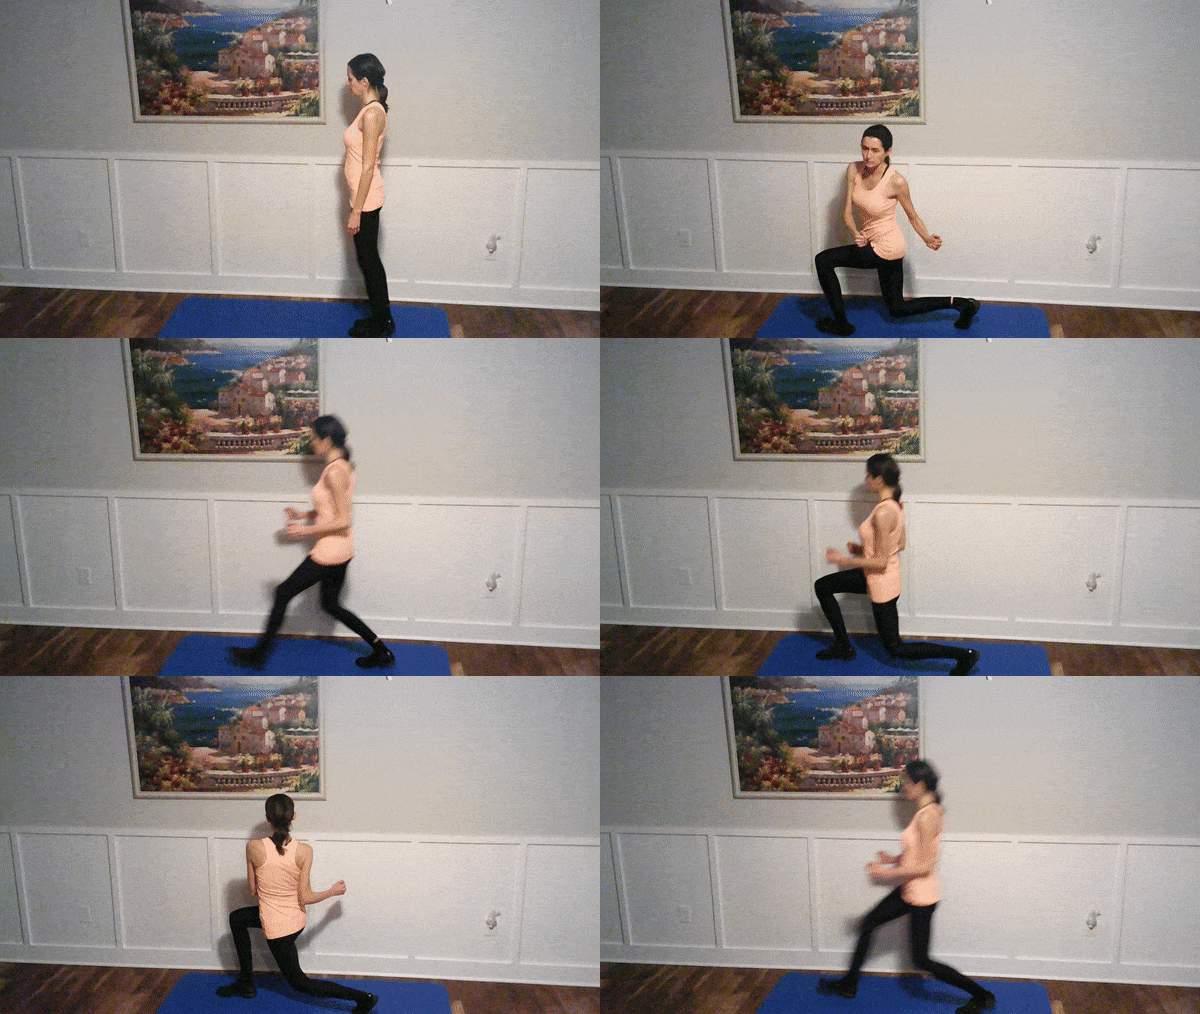 Click this link to watch the full Lunge Torso Twist video on YouTube.com
Suggested amount:
Beginner: 2 sets of 3 repetitions (reps) on each side (pause at least 10 seconds between sets)
Intermediate: 3 sets of 5 reps on each side
Tips:
-
Make sure your front knee does not go past your toes. This helps reduce pressure on your lower back.
-
Work to reach about a 90 degree angle behind your knee when you bend down into the squat.
-
Keep your torso and head up and straight the whole time.
- Avoid having your back knee hit the ground. End the lunge about a couple inches or more before your back knee reaches the ground.
Muscles worked:
Core, quads, and glutes.
Video:
Check out lunge with twist By Amy Clover on YouTube.
Benefits:
Improves balance.
10. Squat Jumps
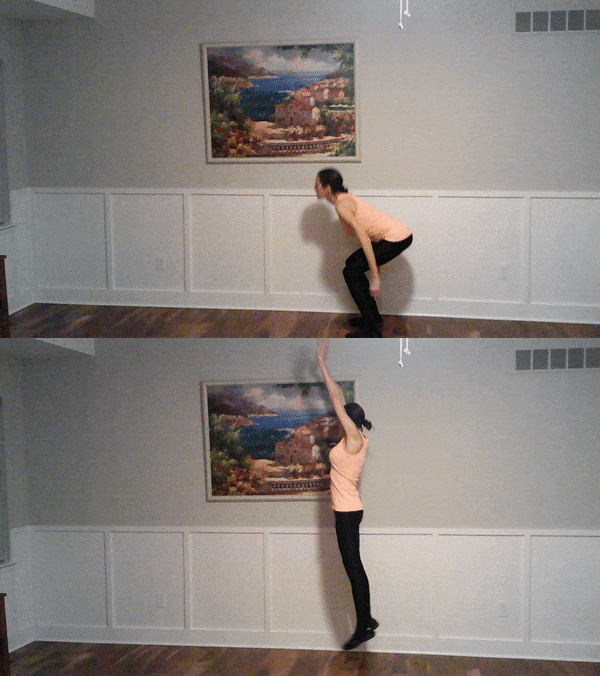 Click this link to watch the full Squat Jumps video on YouTube.com
Suggested amount:
Beginner: 3 sets of 5
Intermediate: 3 sets of 10
Tips:
- Keep your feet shoulder width apart.
- Squat down by pushing your butt back out behind you.
- Jump your way up from the squat.
- Wear good sneakers with good soles to help absorb the shock.and soften your landing.
- Give yourself a soft landing by using your muscles to land into a controlled squat, bending at the knees.
- Your chest should always be higher than your hips the whole time.
Muscles worked:
Lower abs, leg muscles, quads, hamstrings, glutes, and core
Video:
Check out how to do a squat jump by Howcast on YouTube.
Benefits:
- Burns calories and fat.
- Maintains mobility and balance.
- Jumps and other strengthening exercises can help improve bone density.
11. Reverse Lunge
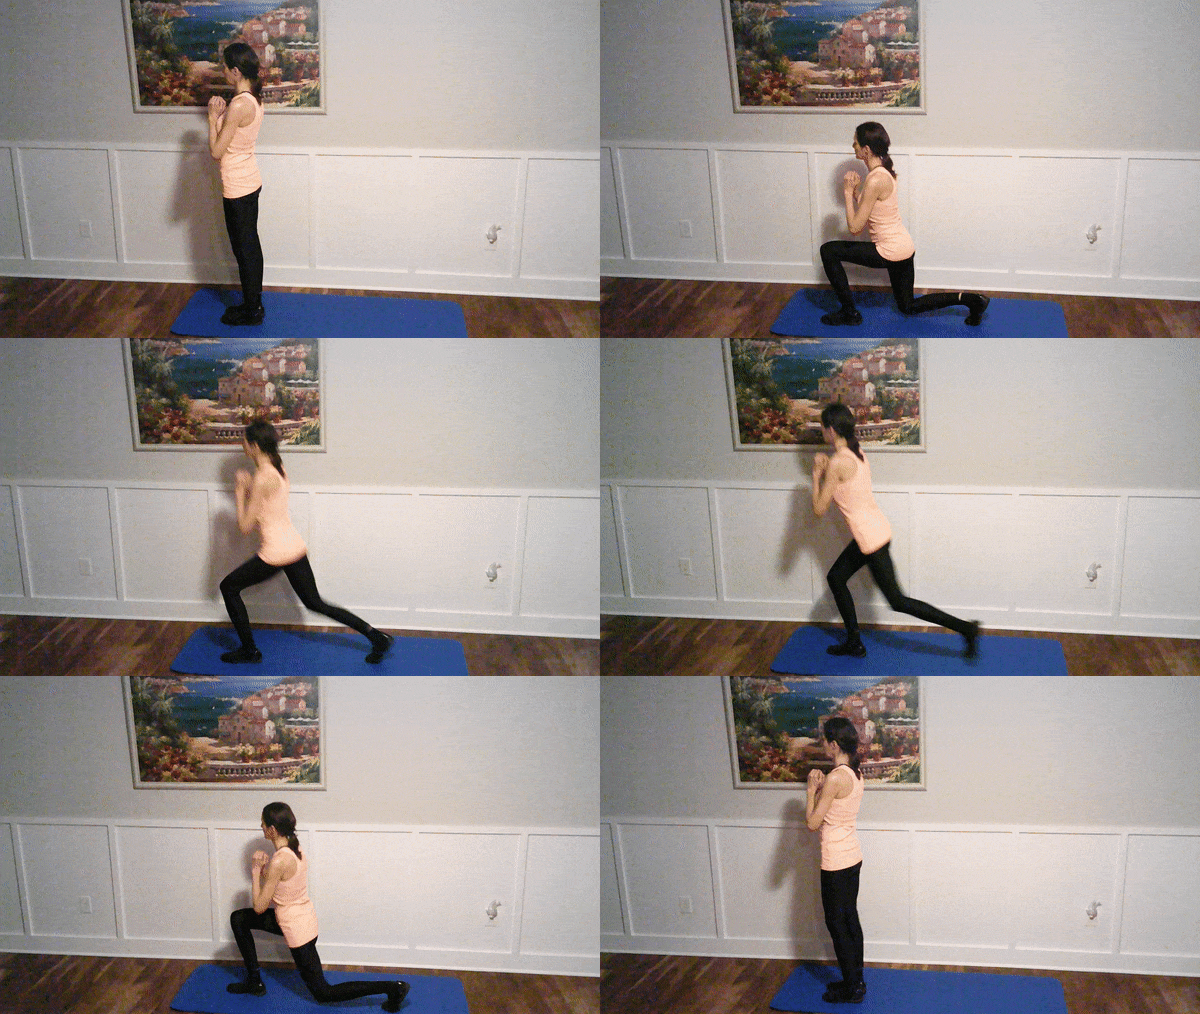 Click this link to watch the full Reverse Lunge video on YouTube.com
Suggested amount:
Beginner: 3 sets of 10 reps (5 reps on each side)
Intermediate: 3 sets of 20 reps (10 reps on each side)
Tips:
- Keep the forward leg stationary as you step back with the opposite leg and squat.
- Make sure your front knee does not go past your toe as you step back.
- Do not let your back knee hit the floor. Rise back up before your back knee gets too close to the ground.
Muscles worked:
Hamstrings, quads, glutes, calves, core, and back.
Video:
Check out how to do a reverse or backward lunges by He and She Eat Clean on YouTube.
Benefits:
- Puts more stability on your front leg than a standard lunge.
- Improves balance, stability, and coordination.
12. Lunge Jumps
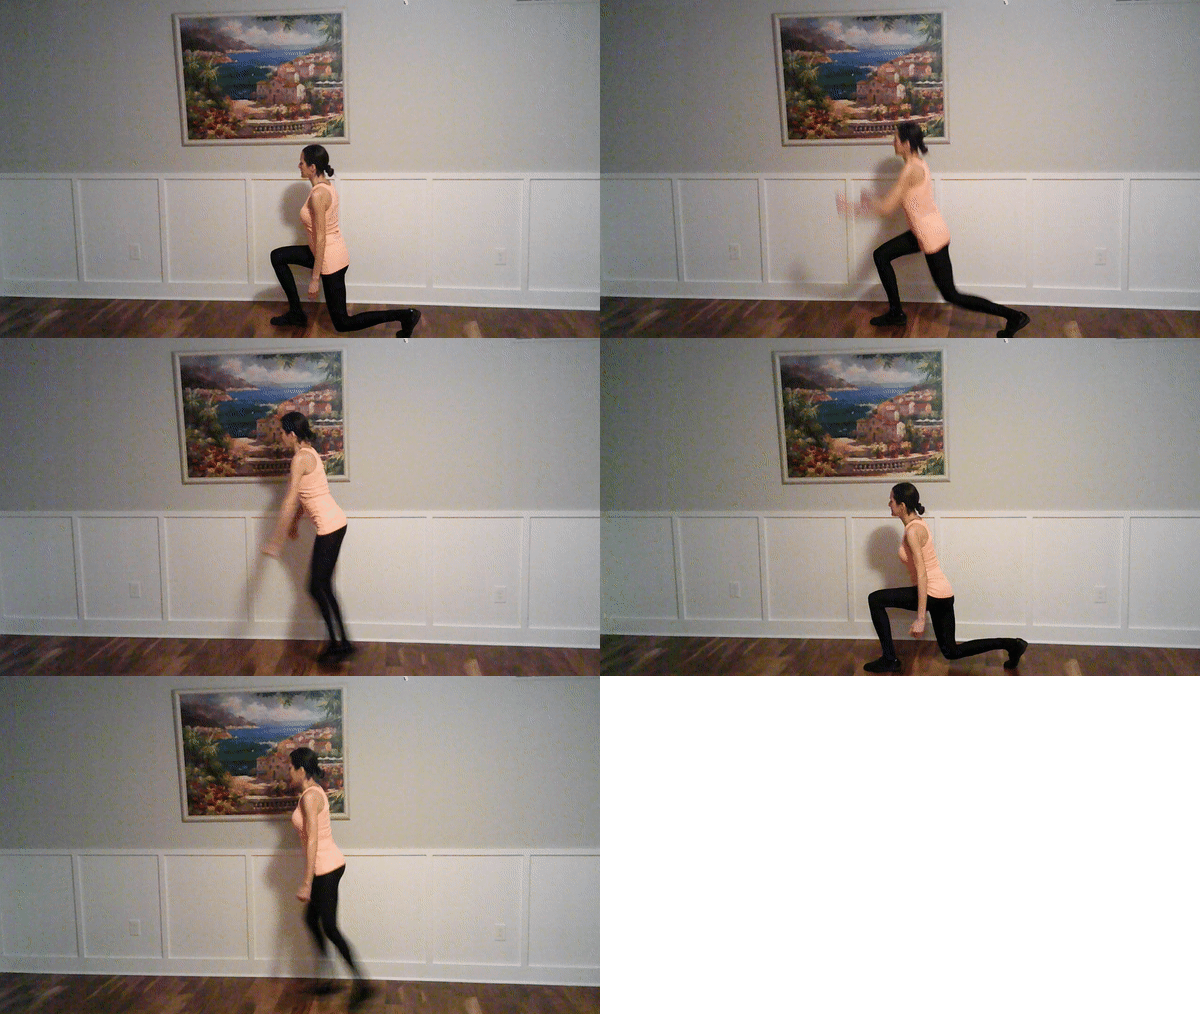 Click this link to watch the full Lunge Jumps video on YouTube.com
Suggested amount:
Beginner: 3 sets of 6 reps (3 reps on each side)
Intermediate: 3 sets of 12 reps (6 reps on each side)
Tips:
- Engage your muscles to slow your lunge on each landing.
- Do not allow your back knee to touch the floor. End the lunge at least a couple inches before your back knee reaches the ground.
Muscles worked:
Glutes, quads, hamstrings, hip flexors, and calves
Video:
Check out lunge jumping by FitnessBlender on YouTube.
Benefits:
- Great cardio exercise
- Develops and improves lower body strength
- Improves your balance, stability, and coordination
13. Side Lunges
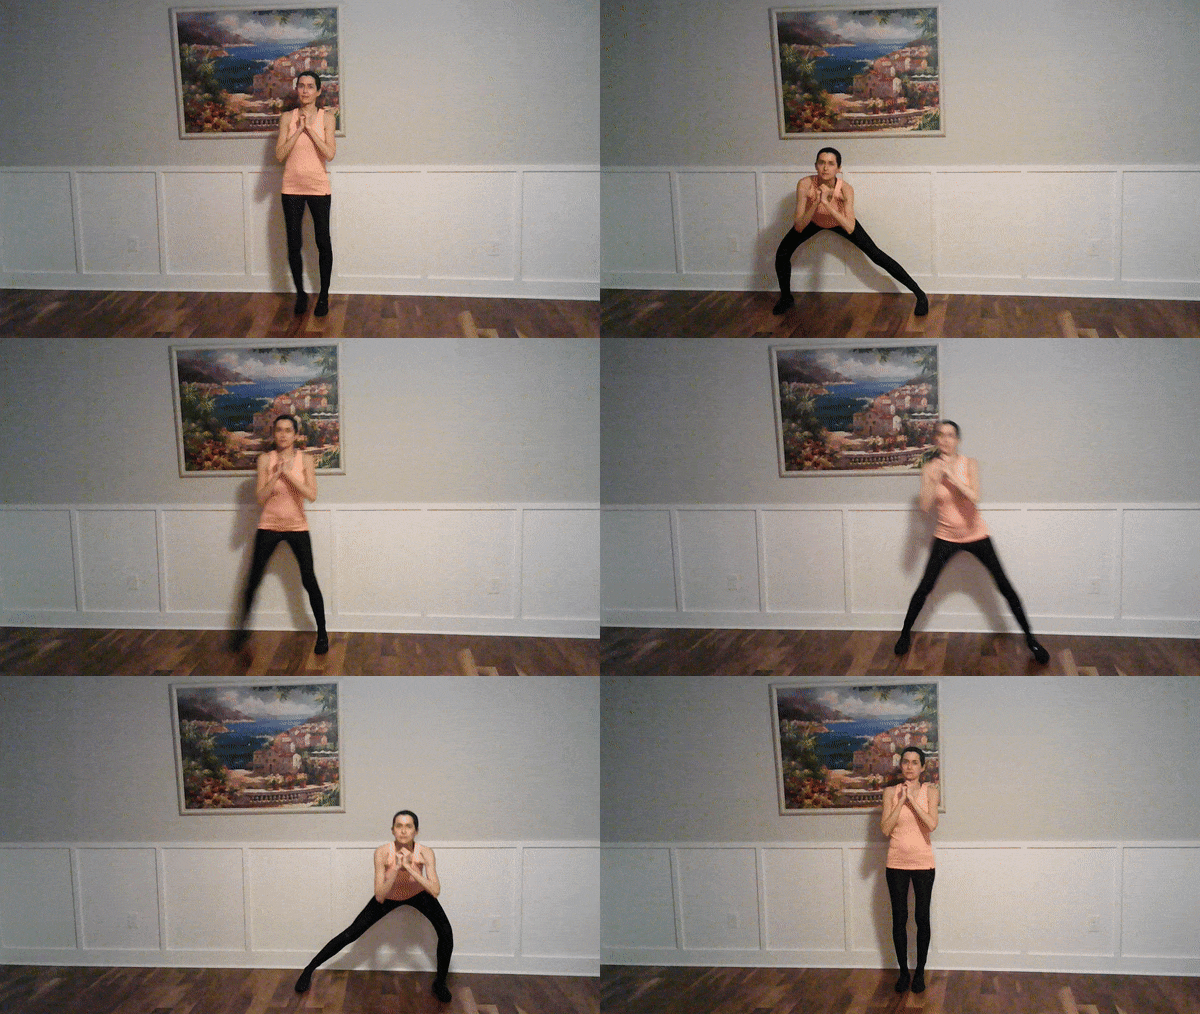 Click this link to watch the full Side Lunges video on YouTube.com
Suggested amount:
Beginner: 2 sets of 2 on each side
Intermediate: 3 sets of 5 on each side
Tips:
- Squat down as low as you are comfortable, as long as your knee does not go past your toes.
- Step to the side as far as you are comfortable.
- Bend only the knee of the outer leg and keep your inner leg straight and diagonal as you lunge to the side. The side lunge requires more balancing and strength than a side squat.
Muscles worked:
Legs, glutes, and outer thighs.
Video:
Check out how to do a side leg squat by Livestrong.com on YouTube.
Benefits:
- Adds a side movement to your workout. Most workouts are forward and back.
- Improves balance, stability, and coordination.
- Helps reduce hip dips (saddlebags).
14. Walking Lunges
 Click this link to watch the full Walking Lunges video on YouTube.com
Suggested amount:
Beginner: 3 sets of 5 reps.
Intermediate: 3 sets of 10 reps.
Tips:
- One leg steps forward as back leg lowers into a lunge
- Make sure your front knee does not go past your toes.
- Lunge in a controlled manner so your back knee does not hit the ground. Keep your back knee at least a couple inches above the ground. Only lunge as low as is comfortable for you.
- Keep the entire foot and heel of your front leg down.
- Keep your back as straight as possible.
Muscles worked:
Quads, glutes, and hamstrings.
Video:
Check out the walking lunge by CrossFit® on YouTube.
Benefits:
- Helps improve balance, stability, and coordination
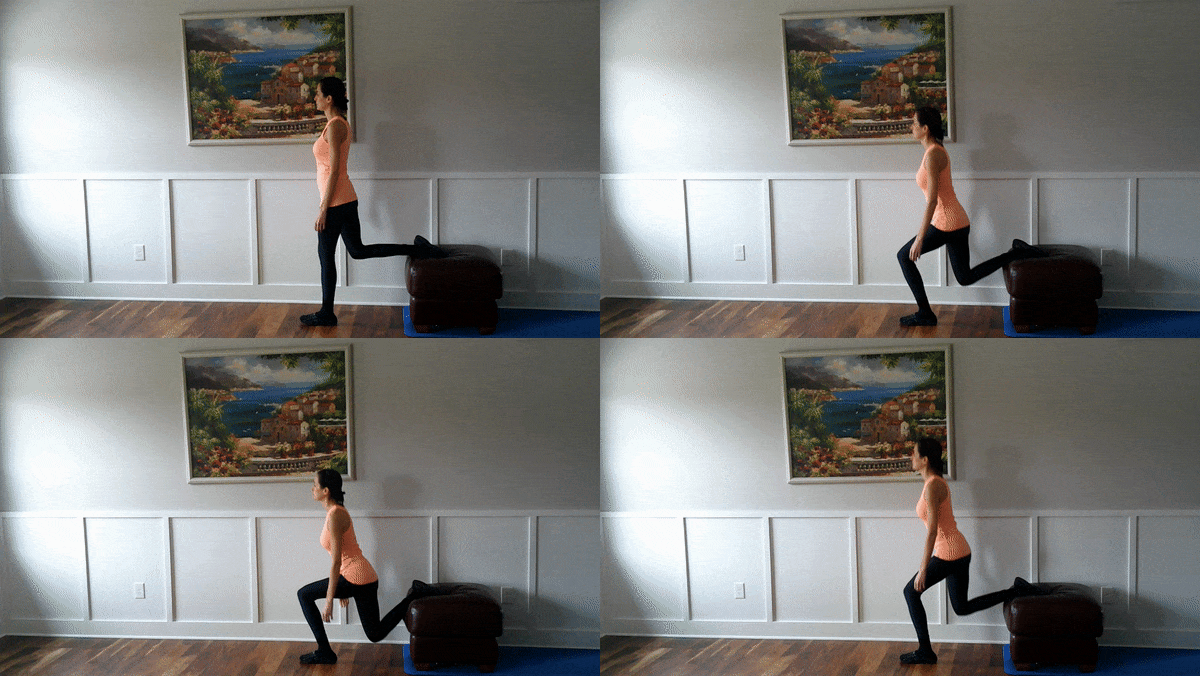
15. Rear Foot Elevated Split Squat (Bulgarian Split Squat)
Suggested amount:
Beginner: 2 sets of 3 reps on each side
Intermediate: 3 sets of 10 reps on each side
Tips:
- To get into the starting position, take 3 steps back to back away from the bench you are using. See this video for details on that. Start with about a 90 degree angle on your back knee when your back foot is elevated on the bench.
- Place your back foot on the bench up to your ankle, not just the tips of your toes.
- Keep your back as straight as possible the whole time.
- Keep your front leg only about 2-3 of your own feet before the bench, enough to make sure your front knee does not go past your toes when you squat down, but not so far forward that you are unable to keep a flat back when you squat down.
- The bench you use should be about the same height as your knee.
- If you use something as your bench that may slide, such as an ottoman or a chair with a cushion, place it on a yoga mat so that it doesn’t keep sliding further away behind you as you squat down.
- The bench you use should be cushioned, such as a couch seat or a chair with a light cushion or towel on it, to cushion your back foot.
Muscles worked:
Quads, hamstrings, glutes, core.
Video:
Check out rear foot elevated split squat by Central Athlete on YouTube.
Benefits:
- The split squat is a great alternative to the back squat. Both of these exercises work similar muscles. The back squat requires a barbell. The split can be done without gym equipment.
- Improves stability, balance, and coordination.
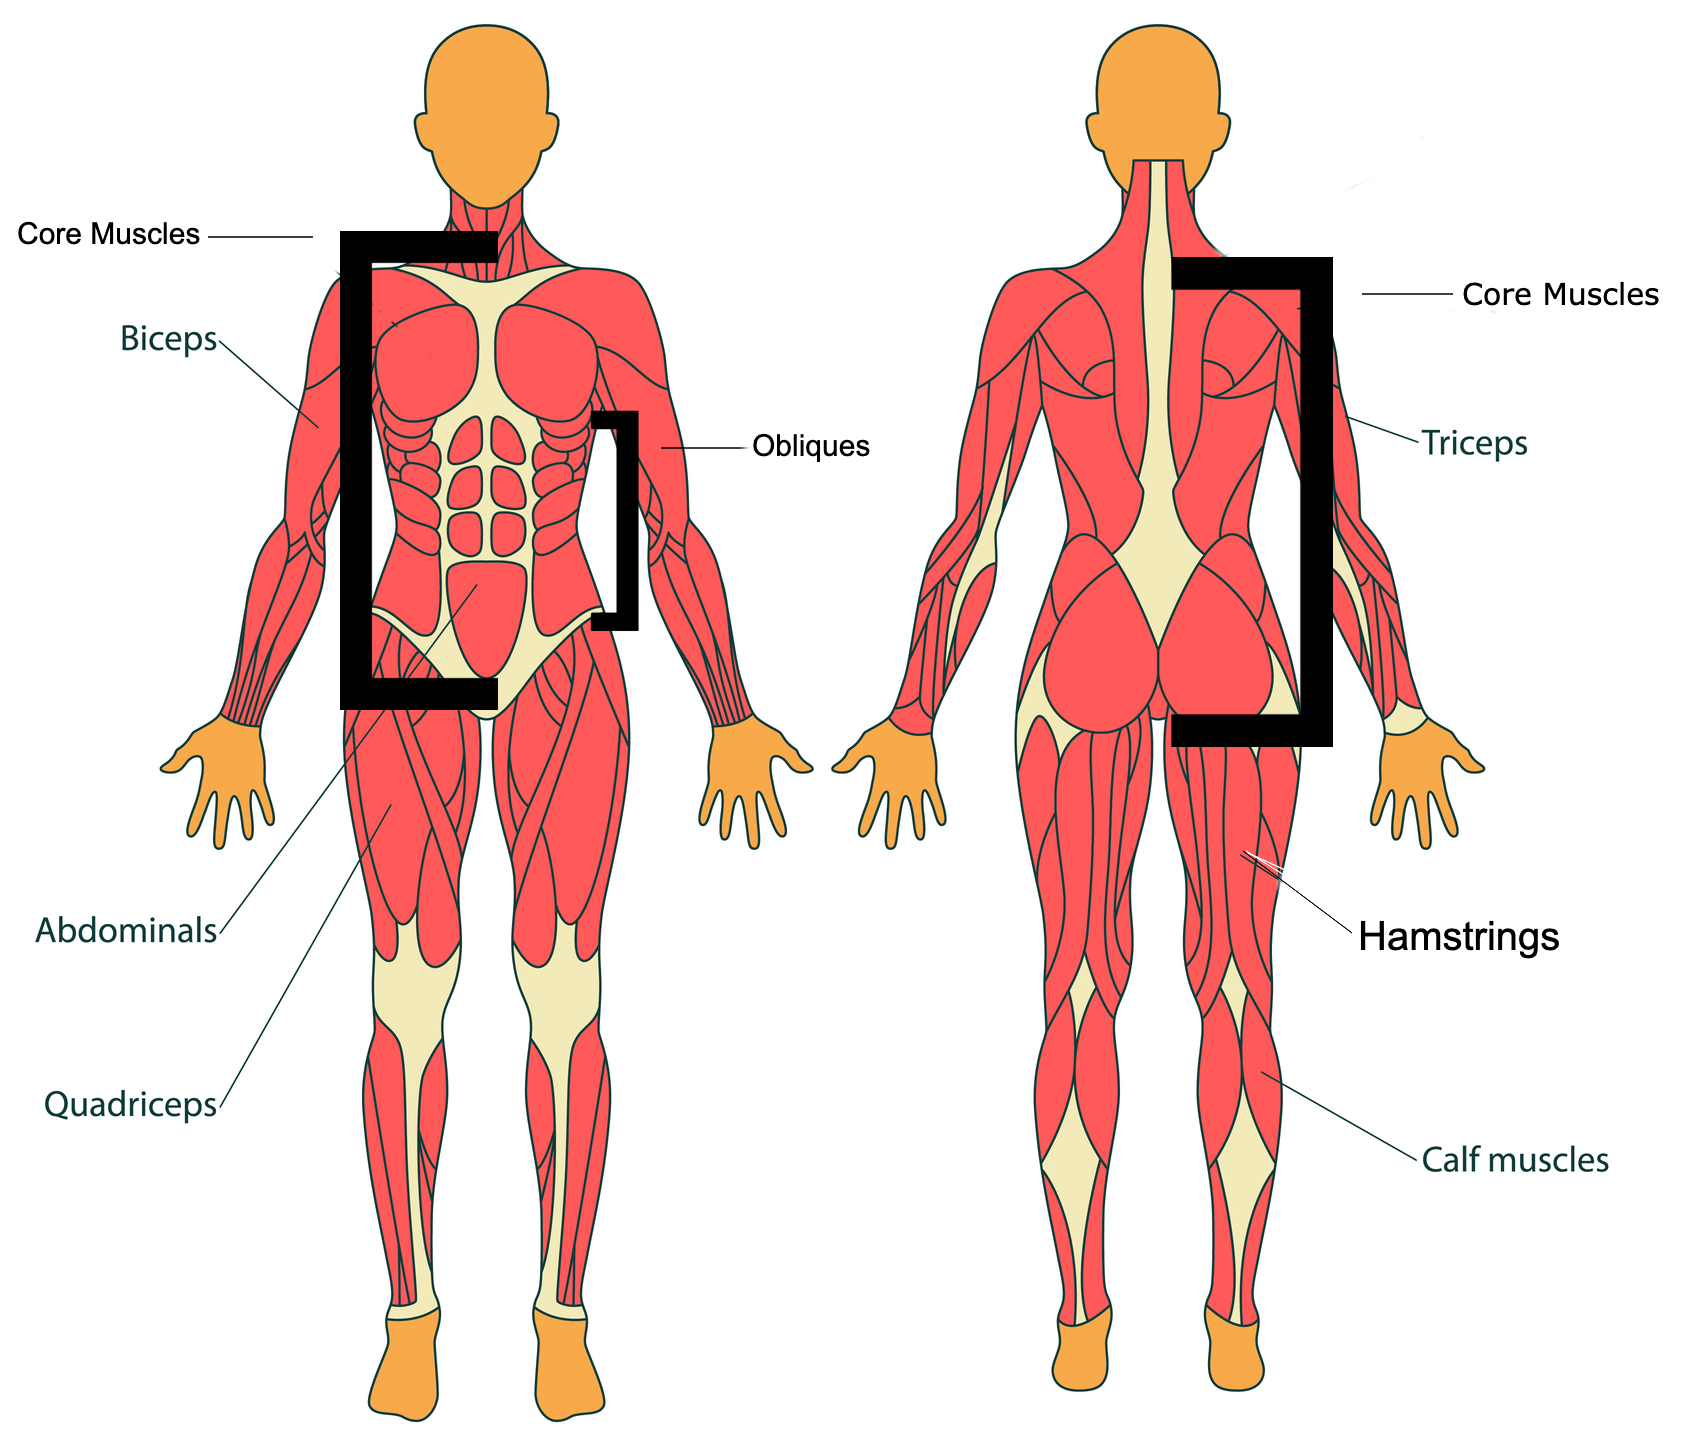
Fitness to Do at Home | Visual Guide to Muscle Building

